Part 1: Description and Measurements
Introduction and Historical Background
Hakama are a type of pants worn, in different forms, by all classes of Japanese people across the many times periods from the Heian through Momoyama eras. Even beyond then, into the Edo period and modernly, hakama are a standard part of traditional Japanese style clothing. This multi-part article will discuss a little bit about hakama and provide a pattern for making your own hakama. We should note before we get going that there are many styles and variations on hakama between men and women, high and low class, and hundreds of years of fashion. As you find out more and more about this kind of garment, you will likely find new variations which are not discussed here. Fashion was and is a living art with new horizons all the time. We will give you the best information we can and we hope you find new discoveries beyond what is here. This is not the only way to make a pair of hakama.
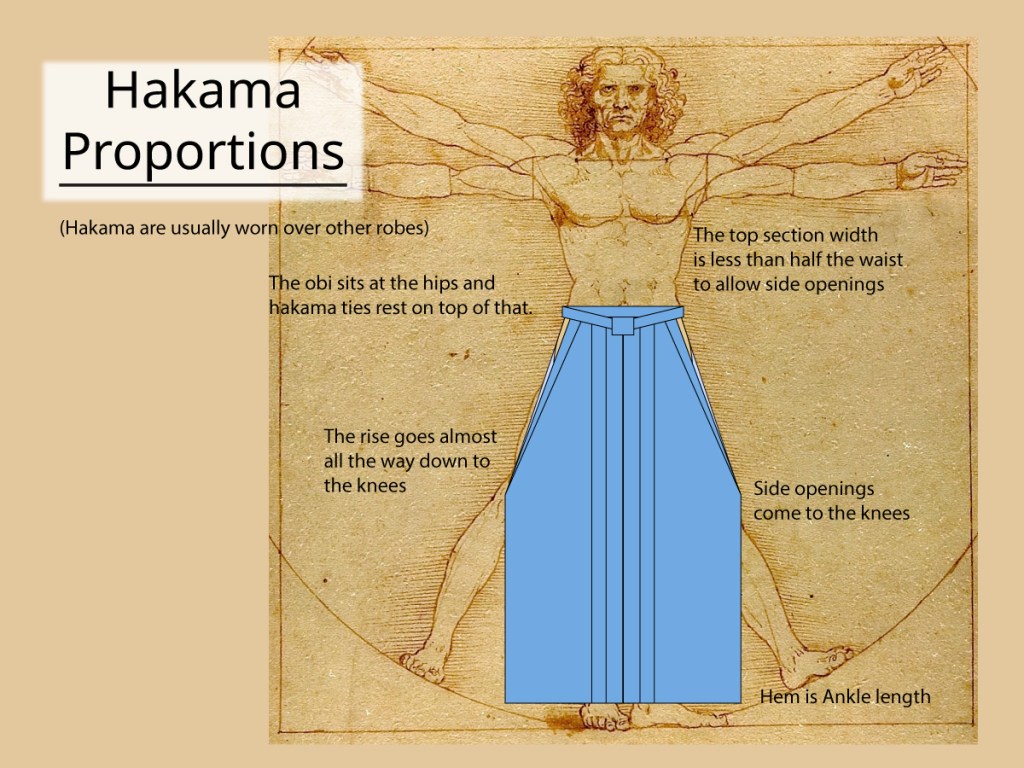
The majority of hakama are split legged pants/trousers which have a separated front and back on top with long front and back ties to secure the pants around the waist of the wearer. Hakama are made, like so many kinds of Japanese clothing, from long rectangular panels of cloth joined together along the long sides to make the pant legs. Very often, hakama have a square gusset at the crotch to maximize the movability of the wearer. Hakama have triangular side openings on their tops on the right and left sides. Historical examples show that these side openings go down to about the knee of the wearer. Hakama are also gathered with center facing pleats on both the front and back which run straight down the entire leg. Most hakama are about ankle length with a wide opened bottom hem.
There are many different kinds of hakama used for different purposes and which have many different names. Unfortunately we won’t be able to treat upon all of them in this article. Here are a couple short descriptions to be on the lookout for, though. Sometimes there is some overlap in what kind of hakama are called which name, so it can be useful to be flexible when considering exactly what kind of clothing you want.
- Nagabakama – Nagabakama (literally “long hakama”) are hakama meant to be long enough to drag on the floor. They were worn mostly by upper class nobility when they did not have to go outside or move around very much at all.
- Sashinuki – Sashinuki are a kind of hakama which have a drawstring around the bottom hem and which can be pulled closed around the ankle, or sometimes the bottom of the knees. Large Sashinuki are often worn with formal court robes, but the hakama that go with a style called the hitatare are also a kind of sashinuki.
- Shitabakama – These are a kind of middle layer often used to give extra volume to more fashionable hakama. The “shita” (下) in shitabakama means that these are literally “under hakama.”
- Uwabakama/ Ue no Hakama – These “over hakama” (表袴) are a special formal hakama that are worn with court robes.
Measuring for Size
Which Measurements?
You will, of course, want to know what measurements you are working from to make your hakama. You don’t need too many measurements to get started because hakama are fairly loose. You will want to know the following:
- Panel width – This is your basic width of fabric for the long rectangles that make up all Japanese clothing. It is roughly equal to half of the distance from your center back to your wrist. If you are taking this measurement from scratch, hold your arm out sideways at a forty five degree downward angle. The measure from your center back, over the point of your shoulder, and down to the wrist. That full measure is your “yuki” and half of that is your panel width. If you already have a panel width from making other kimono or japanese garments, you can use that instead.
- Leg Length – Measure from where you hakama will sit (probably the top of your hips or at your natural waist) down the side of your legs to your ankle. This will be how long you want to make your hakama panels.
- Top to Knee – The side openings of historical hakama go down to about the knee of the wearer. Measure from where you hakama will tie down to the top of your knee.
- Rise – The rise on a pair of pants is the distance from your belt, down the crotch and back up to the belt line in back. The rise on hakama is very generous, which allows space for the kimono that are worn underneath to have a little room. Measure from where you hakama will rest down to about the top of your knee on the inside. This can be a little shorter or longer, based on your own preference.
- Waist Circumference – The ties on your hakama will wrap around your waist several times so you will want to know how big that is.
- Front Width – This is the final width of the pleated area at the top of the front of the hakama. Knowing how wide you want this section to be will be helpful in determining how deep to make your pleats and how to do the folds on the side opening. It looks like, historically, this measurement was somewhere between 100-75% of the width of one panel.
- Back Width – Similar to the Front Width, this will be the width of the pleated section, but in the back of the hakama. Several historical examples show that this width would be the same as the front width, although as time moved on, it was often more narrow than the front; as little as 60% in at least one instance. For ease of measurement, keeping the front and back width the same should be perfectly fine.
Summary Reference
To summarize the need measurements, you can refer to the following:
- Panel Width – halfway from center back to wrist
- Length – waist/hip to ankle
- Knee Length – waist/hip to knee top
- Rise – waist/hip front to knee top
- Waist Circ – around the waist/hips
- Front – 100-75% Panel Width
- Back – Same as the Front Width
Pieces
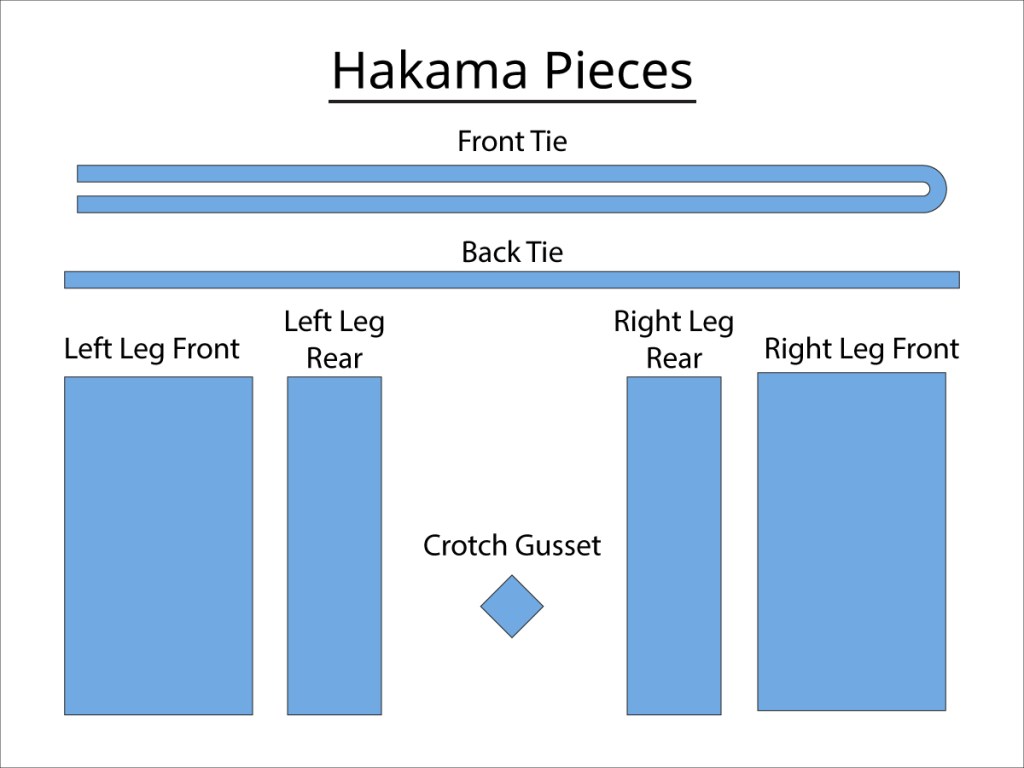
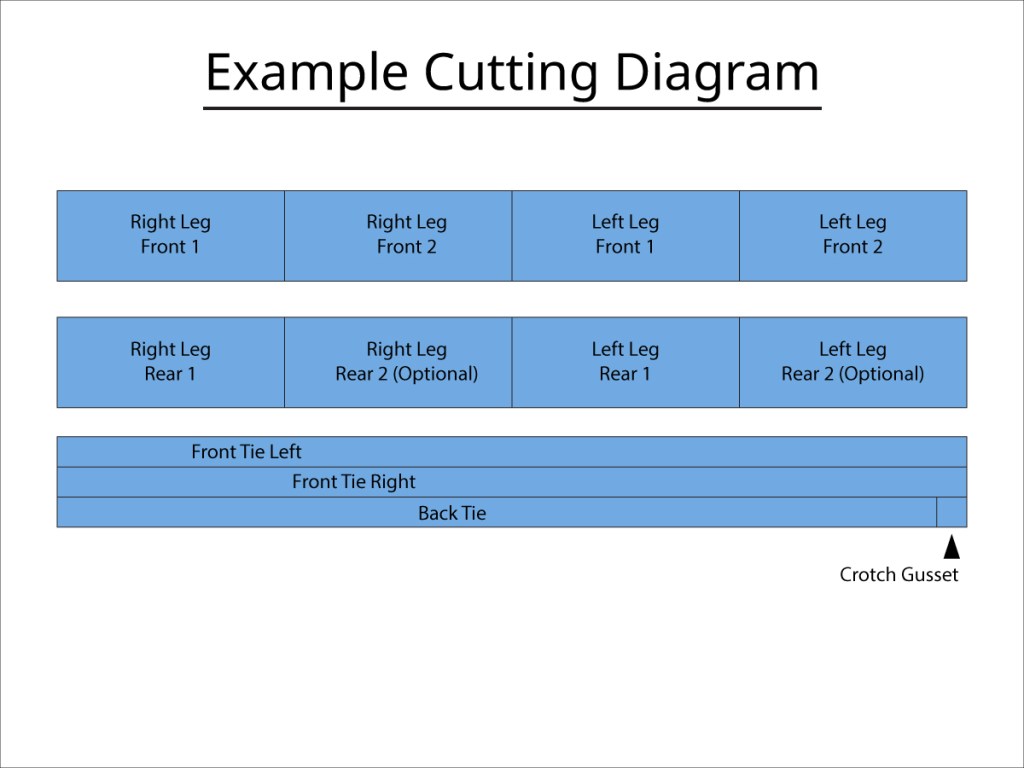
You will need to cut out the following pieces for your hakama. All of these are rectangles that can be cut straight from full widths of cloth. You will want to use the measurements you took earlier and add seam allowances to all edges. So, for example, if you are using a seam allowance of 1.5” a length of 38” will really be 41” (38” + 1.5” + 1.5”.)
- Crotch Gusset (1) – This square panel should be between 6 to 9 inches per side, plus seam allowances.
- Leg Panels (6+) – Each Leg Panel should be 1 Panel Width by 1 Full Hakama Length. You will need at least 3 of these per leg, with more making fuller hakama. If you have an odd number of hakama per leg, there should be more panels in the front of the leg than the back.
- Back Ties Panel (1) – This panel should be about 8-10 inches wide and as long as twice your waist measurement plus some extra length to be able to tie a knot.
- Front Ties Panel (1) – Also 8-10 inches wide but 3 times as long as your waist measurement plus length for tying a knot.
There’s More
This article has three parts.
- Part 2: How to Fold Pleats
- Part 3: Assembling the Hakama

Leave a reply to Making Hakama: Pants for Samurai (3/3) – 旦暮庁 TANBO-CHŌ Cancel reply