Preface
This is the fourth entry in the article series about Japanese lanterns. This information is from an SCA Arts & Sciences competition entry. This section is the third appendix to the entry and is about the more detailed steps of construction for the hako-chouchin (collapsible box style lantern).
Appendix C: Hako-chouchin Construction Steps
Materials
- 1 x sheet of 1/16” or ⅛” thick basswood to cut out circles of wood
- 2 x strips of 1/16” thick basswood (1 ½” x about 24”)
- Multiple lengths of round rattan weaving cane (3 mm diameter)
- About 18” length of 16 gauge galvanized steel wire
- Washi paper
- Black lacquer paint
- Small nails or large brads
- Gloss finish clear cover spray paint
- Masking tape
- Wood glue
- White PVA glue
- Cotton string/twine/yarn
- Hot water or off brand window cleaner (with ammonia)
Tools
- Cutting tools (Craft knives, Cricut, or laser cutter) for cutting out wood circles
- Container for soaking wood strips.
- Circular wood shaping jig
- Lantern rib jig
- Clamps for holding glued pieces in place
- A 2-3 foot long pole with flat ends
Make the Box Ends
Step 1: Layout
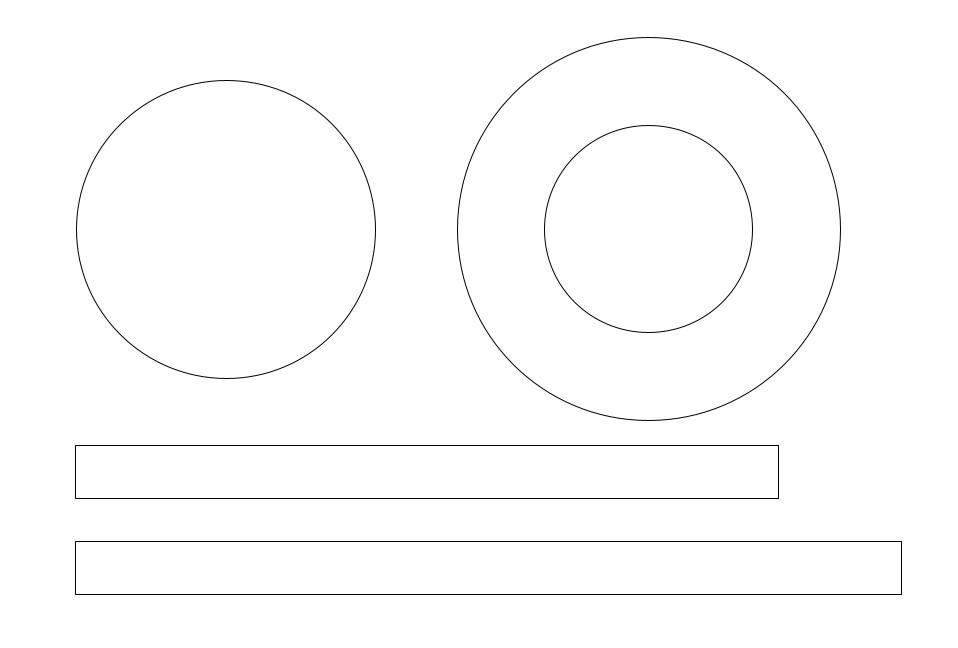
Each box end is a circle with a strip of wood attached around the edge to create a circular box. The top end is meant to be larger than the bottom. The diameters of each circle must be enough that the top box can slide comfortably over the bottom one, taking into account both the extra width added by the box walls and any paint layered on the inside and outside of both ends. The top box also has a hole in the center large enough to insert and remove the lantern’s light source when it is collapsed.
The strips must be long enough to wrap completely around the circumference of the circular sections and have a little bit of overlap at the ends. They must be wide enough that the depth of the final box can completely enclose the height of the collapsed paper section.
Layout of Box End Pieces
Step 2: Cutting Shapes
After determining the sizes necessary for each piece, trace out the pieces on a piece of ⅛” thick balsa wood and cut them out. Strips can be cut from either ⅛” or 1/16” wood. Cut, shave, scrape or sand the ends of the wood strips so that the overlap sections have their thickness tapered.
Step 3: Soaking the Walls
Soak (or steam) the wall strips in hot water for several hours. The water needs to be hot, but does not need to be boiling hot. If you need a long enough container, a PVC pipe with one end capped and glued will serve the purpose. Make sure that the pipe is long enough that when it is stood on its end, the wood strips can be completely submerged inside it. Also make sure that the pipe is wide enough diameter that the wall strips can slide in and out of it easily, even after expanding in the water. The strips may need to be weighted down to make sure they do not float to the top of the water and become partially exposed.
Note: It is also possible to soak wood strips in off brand window cleaner. The ammonia in the cleaner will break down the lignin in the wood, making it more pliable.
After the strips are properly softened, remove them from the water and immediately wrap them around a round form that is the same as or close to the circumference of the circle to which the strips will later be attached.
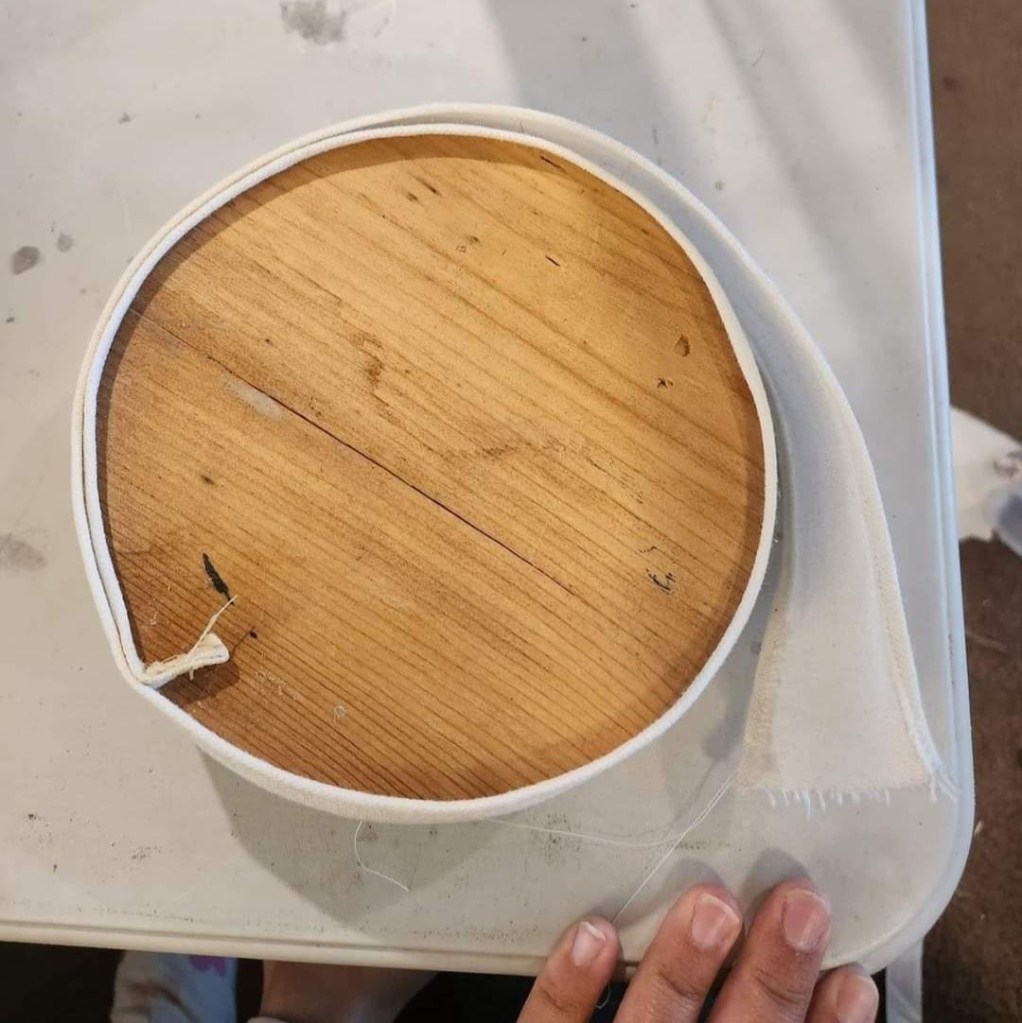
Strip Drying Form
Step 4: Assembly
After the wall strips have dried, glue them around their respective circular sections. Clamp the walls to the circle sections, and clamp the overlapping section together while the glue dries. After the glue is dry, plug any holes with wood putty and sand the surfaces smooth, especially around the corners.
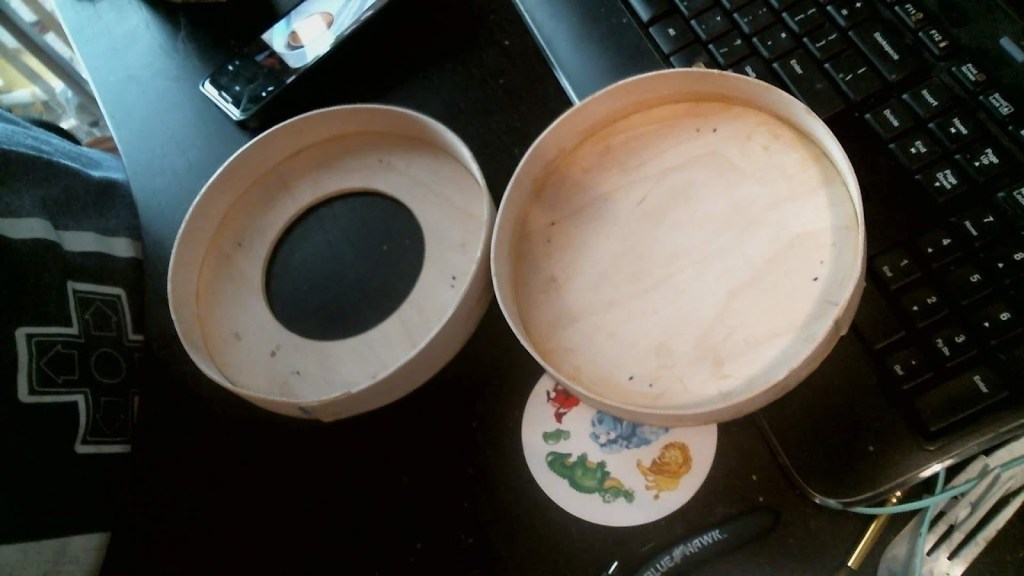
Glued Box Ends
Step 5: Painting
Paint or stain the box ends. Traditionally lacquer would be used here, but modern paints which will protect the wood are much easier to find and use. Drill or cut 4 holes in the ends for brads or nails. The nails should be placed evenly around a circle that is a little larger than the rings in the paper section of the lantern. This way they can be bent in over the end ribs to secure the whole lantern together.
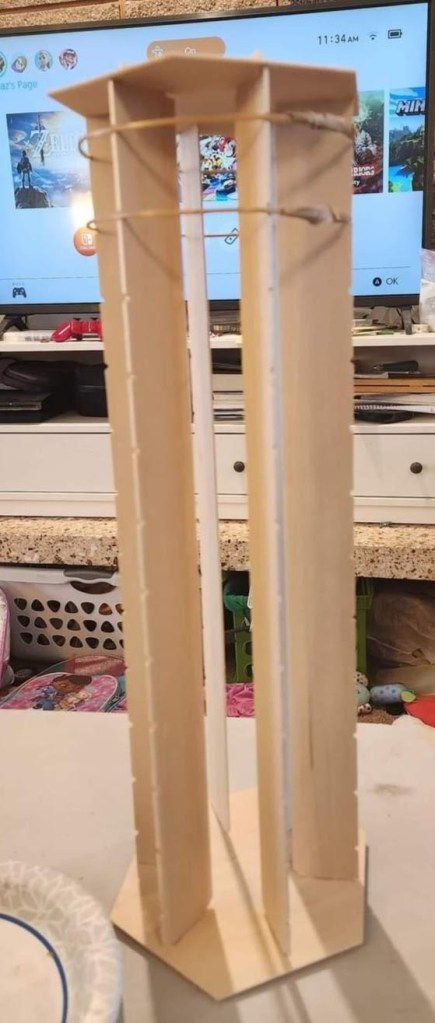
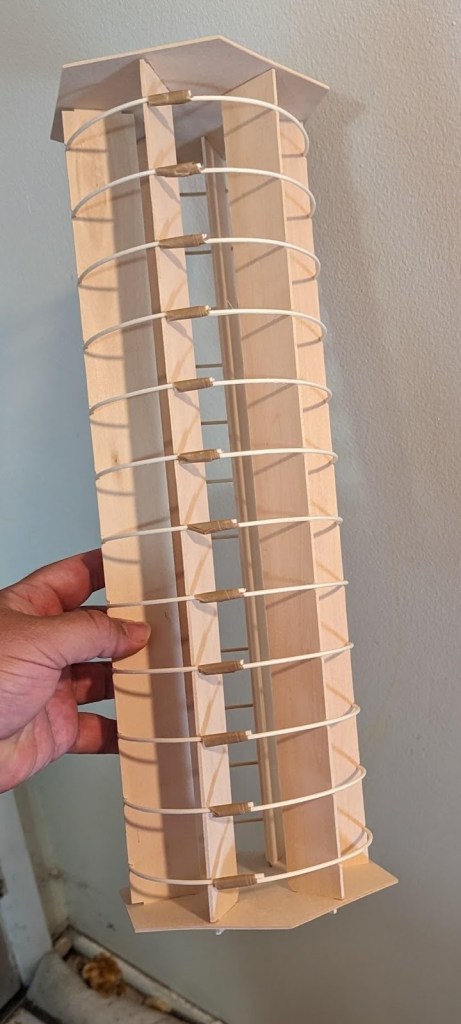
Assemble the Jig
The Jig is made up of its own ends and posts. The posts slot into holes in the end sections and have indentations along their length to serve as guides for the ribs. Slot all posts into the jig with the indentations facing outward.
Make the Paper Section
Step 1: Cutting Rib Pieces
Cut each section of bamboo or reed long enough to wrap around the circumference of the jig and have some extra overlap as well. Remember that the size of the circumference will be the diameter of a circle times pi (about 3.14.) Using the value of three times the diameter of the circle plus an inch or two will likely serve in almost all cases.
Step 2: Wrapping the Ribs
Carefully wrap the ribs around a set of indentations in the jig posts. Where the rib meets itself again, wrap masking tape around the overlap area one or two times. Snip off any extra length of the rib reed. Repeat for each rib along the entire length of the lantern. After all ribs have been wrapped, slide each one around the jig so that the taped sections are all lined up with each other.
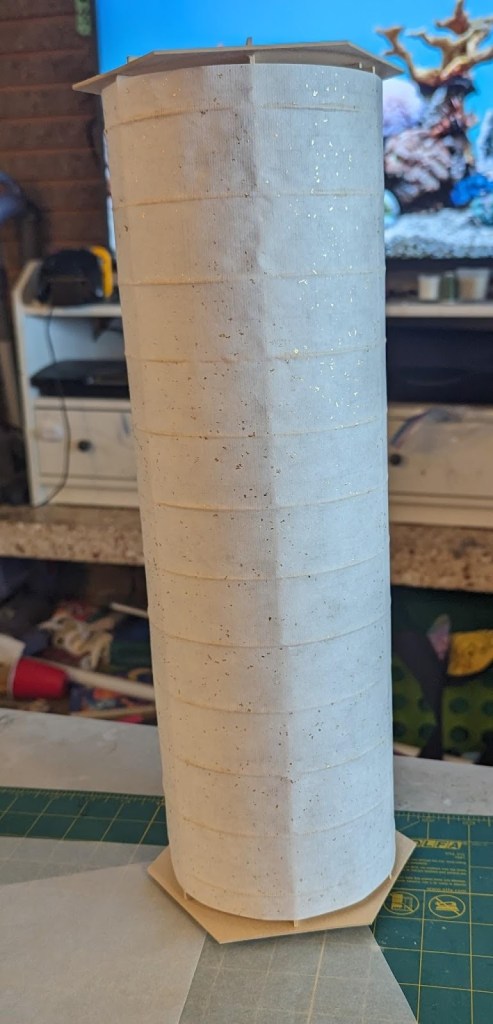
Step 3: Adding Paper
Cut out enough paper to cover the entire cylinder of ribs with enough height to extend past the ribs for about half an inch or so on either side of the assembly. Dab thick glue along the outside of the ribs in the space between two posts. Glue should not go onto the ribs in the places where it is touching the jig, or else those sections may become permanently attached to each other.
Carefully stretch the paper over the glued area of the ribs. You may need to gently smooth the paper over in those sections. Take the paper that is laying over the unglued sections of ribs to expose those areas for more glue application. Dab glue onto the next section and carefully spread the paper onto this section as well. Repeat this cycle until the entire structure is covered by paper.
There should be some overlap at the end of the paper. Apply glue to the underside of the overlap section which will go on top of the other. Lay the paper and spread gently.
Finally, fold the excess edges at the top and bottom of the cylinder to the inside and glue them in place.
Final Assembly
Step 1: Top Side
Insert brads into the holes in the top box end with the caps on the outside of the box and the points facing inward. Spread the points so that one side of a brad is flattened against the box end surface and the other is a hook facing the center of the circle. Place the paper section into the box end, with one rib inside the circle of brad points. Push the point of one of the hooks through the paper of the cylinder and use your hand or a short wooden pole to tamp the point of the hook down so that it folds down over one of the rib. Repeat with the other three brads. For the final point, you may have to squish the circle formed by the rib so that it fits inside the hook circle and then let go to allow the hook to pierce the paper. Tamp down this final hook.
Step 2: Bottom Side
Repeat the same process as for the top side, but use a pole to tamp down the hooks by reaching it through the top opening in the lantern.
Step 3: First Fold
Pre-fold the paper by squeezing each section of it. One section should be squeezed in a clockwise direction, and the next should be counterclockwise. Alternate directions for each section all the way down. Then collapse the lantern down.
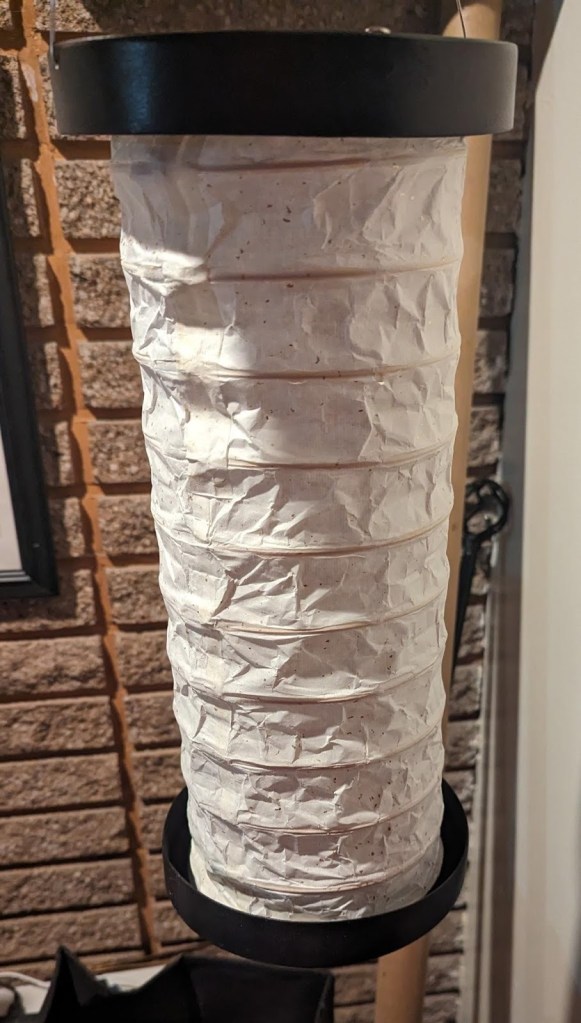
Step 4: Top Handle
Measure and cut a section of wire that is a little longer than half the circumference of the top box end. Drill small holes in opposite sides of the walls of the top box and put the ends of the wires through each one. Bend the wires up to secure them into the box end.
Series Links
This article is one of a series about this subject. These are the individual posts.

Leave a comment