Preface
This is the third entry in the article series about Japanese lanterns. This information is from an SCA Arts & Sciences competition entry. This section is the second appendix to the entry and is about the more detailed steps of construction for the kago-chouchin (basket style lantern).
Appendix B: Kago-chōchin Construction Steps
Materials
- 12 x 48” strips Flat Rattan Basket Reed (⅜” wide)
- 7-8 x 24-30” strips Flat Rattan Basket Reed (⅜” wide)
- 2 x ¼” d. dowels or bamboo poles 18” long
- 1 x 8” d. Circular piece of plywood (¼” thick)
- 1 x strip of plywood (1” x 8” x ¼”)
- 2 x strip s of plywood (1” x 8” x ¼”)
- Washi Paper
- Colored Washi Paper
- String or thin rattan strip for tying
- Wood glue
- White PVA glue
Tools
- A 5-gallon bucket or equivalent container for soaking reeds
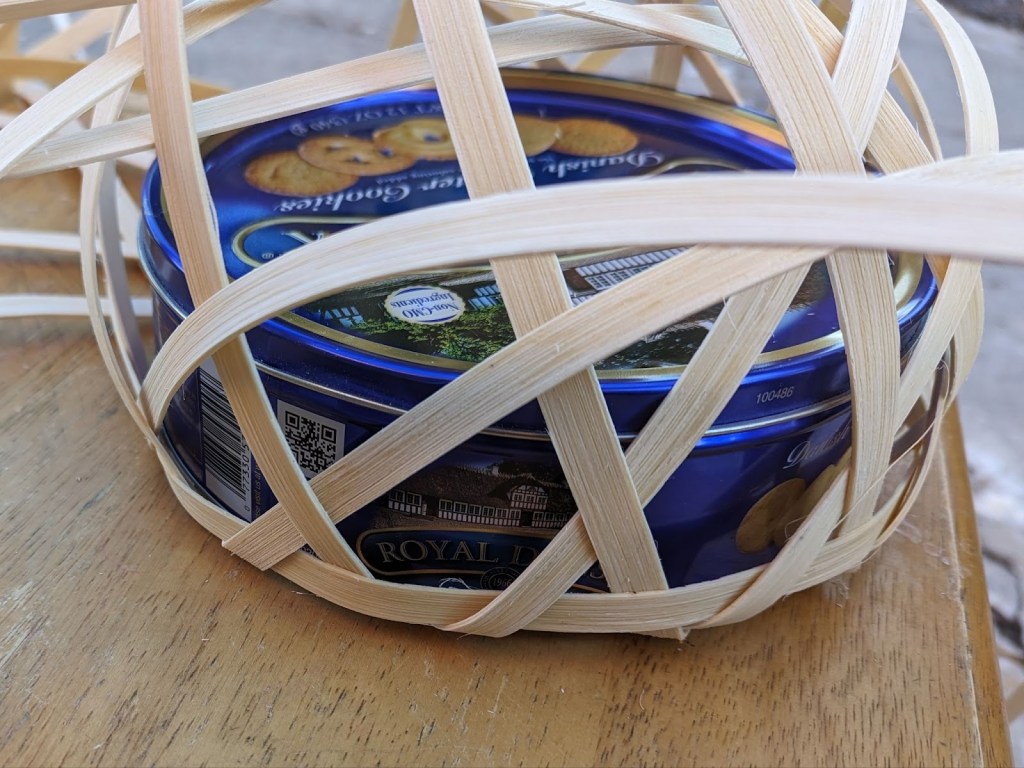
- A mold for the shoulders of the basket. The original uses a 7.5” diameter tin of Royal Dansk Danish Butter Cookies
- (Optional) A spray bottle with water for softening reeds
- (Optional) A saw if any parts need to be cut down or rounded
- (Optional) Clamps to hold pieces while glue dries
The Basket
Step 1: Soak and Measure Reeds
Basket reeds often come in wound bundles of long strips. Separate out the necessary number of reeds and soak them in warm or hot water for about 10-15 minutes.
After the reeds are softened remove from water and measure and cut strips to the necessary lengths. Mark the (lengthwise) center point of each 48” reed.
Step 2: Weaving the Bottom
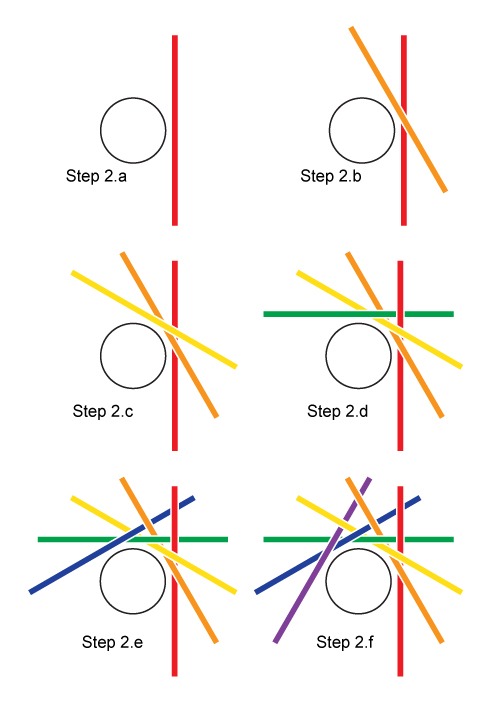
The bottom of the basket is a radial diamond weave where each reed goes over two and then under two. There is an empty space in the middle of the circular weave. The way to start weaving is shown in the graphic below.
2.a.) Begin by placing down a reed to the right of an imaginary circle.
2.b.)The next reed goes on top of that and begins to start a pattern going around the circle.
2.c.) The third reed goes on top of both of those.
2.d.) The fourth reed goes on top of reeds 3 and 2, but gets folded under reed 1.
2.e.) Reed 5 goes two over (4 and 3) and two under (2 and 1)
2.f.) Reed 6 also goes 2 over, and 2 under. How it interacts with reed 1 isn’t as important because the weaving pattern will change before those two reeds meet. (In Step 3.)
Continue this pattern for twelve reeds. You can weave the final reeds back into the first few by matching the pattern in the rest of the ring. In the end, you want something along these lines.

Step 3: Bottom Shoulder and Beginning Walls
The reeds need to be folded up to begin the walls of the basket. The marked intersections form the ring where the reeds are to fold up.

Place your mold over the basket and slide the reeds around so that the folding intersections are aligned evenly around the edge of the mold. Make sure the fold spots are thoroughly wet before folding them up. Begin folding the reeds upward at the base of the mold. Take a horizontal layer strip and weave it into the vertical reeds. Criss cross the vertical reeds above the horizontal strip to keep the horizontal reed in place. These are your first Upward Triangles (Explained further in Step 4.) The result may look similar to the image below.
Step 4: Continuing Walls
Sidebar: Upward and Downward Triangles
The places where reeds intersect from different triangles. Upward facing triangles are used to lock horizontal row strips into place, while downward facing triangles support the next row of horizontal strip.
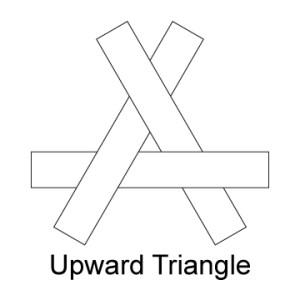
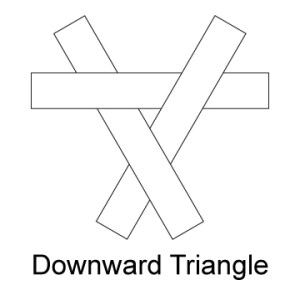
Begin the next row by arranging the vertical reeds into the legs of Downward Triangles. Weave the horizontal strip in and lock it into place by creating Upward Triangles above the strip. Continue this pattern with the next row and the next. Remove the mold after two or three rows. Continue until there are about seven rows or about 10” of height.
As you weave, the horizontal reeds will be longer than the circumference of the lantern. Weave the excess into the lantern. Be sure to begin your horizontal reeds at different places around the circumference so that there is no one area that is prone to sliding open.
Step 5: Top Shoulder and Face
After you have enough layers woven, the vertical reeds are then folded inward to create another woven ring around the top of the basket. This weave creates another over two, under two pattern.
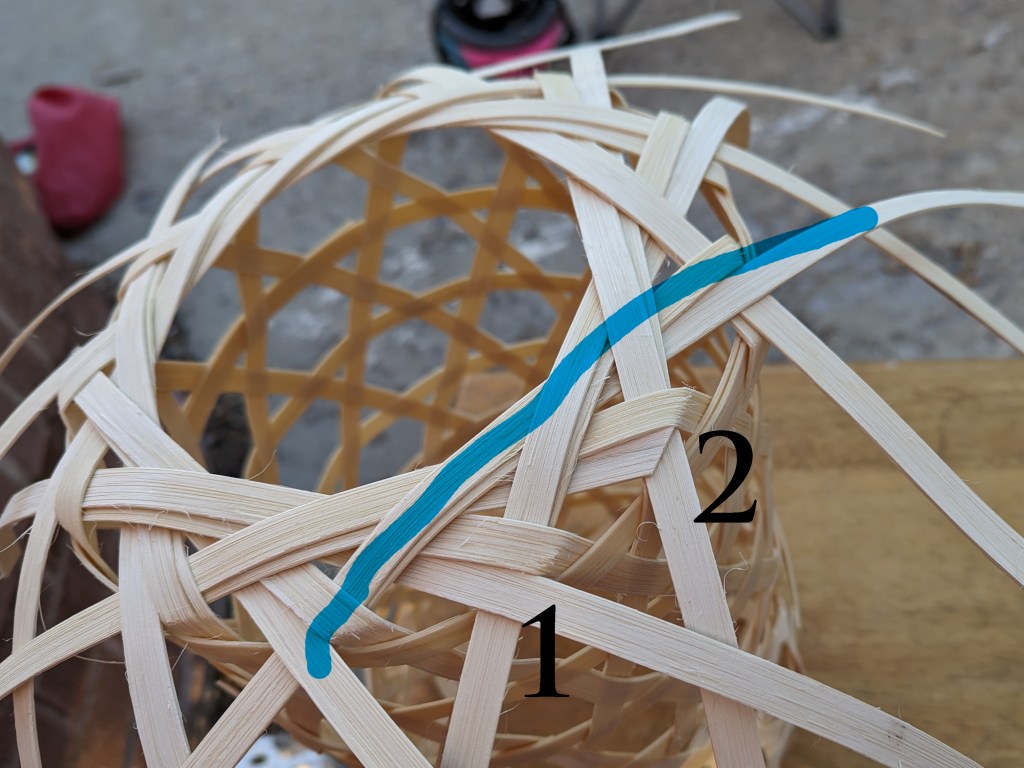
The weave is difficult to explain on paper, but you can weave the reeds so that they meet up with a corresponding reed two intersections away. Reeds that point counter clockwise go under a reed at their initial fold over, then over two, and under two. Reeds which point clockwise do the opposite. Hopefully a graphic will explain.
Step 6: Adding Paper
Take a sheet of washi paper and glue it to the outside of the basket. Dab glue (or rice paste) onto the basket and lay the paper onto it. Smooth the paper out before moving on to the next section of basket. When the basket is completely wrapped, brush some glue onto the underside of the top layer of paper and place the remaining overlapping section on the paper that has already been placed.
Step 7: Top Paper
Cut a circle of opaque colored washi paper a little larger than the circumference of the basket and glue it to the top. Cut out the paper that goes over the central hole in the basket top. Glue rough edges under the lip of the top. Glue a strip of colored washi paper around the top of the wall of the basket so that it covers the edge of the top circle and the white washi paper on the walls.
Making the Frame
Step 1: The Base
The Base of the holding frame may be as simple as a circle of wood. The example on this project is made of plywood with two cross pieces glued to the bottom as feet.
Step 2: The Handle and Posts
Attach the posts to the handle with glue or by lashing. Make sure that the posts are spaced widely enough apart that they can pass through holes in the top and bottom of the basket.
Step 3: Attaching the Handle
Check the spacing of the posts on the base and mark where they sit. Cut out small divots for the posts to sit in. Pass the posts through the holes in the basket and glue the posts and base together.
Series Links
This article is one of a series about this subject. These are the individual posts.

Leave a comment