Preface
This article series is a copy of the documentation used for an Arts and Sciences competition entry in the Kingdom of Artemisia in 2024. The first post in this series includes the main documentation and each subsequent post is one of the appendices which detail several observations about one kind of lantern, and the steps in constructing the respective types of lanterns. The documentation is split up in order to ease the readability of the entire article. Also, the historical information here is not as deeply presented as I would usually prefer for an explanatory article. the focus of this series is on the making process of two kinds of lanterns which are hopefully useful to those interested in recreating or innovating on the idea of period appropriate lighting solutions. So much of what happens in the SCA is about creating medieval feeling experiences. A major portion of this effort is in the things we surround ourselves with while participating in the SCA. I hope that the good samurai of the SCA can have some options open to them as well when it comes to lighting options.
And so, without further ado…
Two Japanese Lanterns
By Yamanouchi Eidou
Introduction
It is an unfortunate aspect of the human condition that, because we live on a rotating oblate spheroid suspended in space near a medium sized star, it gets dark sometimes. This project aims to rectify some of the unfortunate side effects of the above-mentioned situation by creating lighting options which share the aesthetic and functionality of pre-modern lanterns, and which are made with techniques and materials readily available to most players in the SCA.
Historical Background
Like so many other cultures across the world, Japan has been making and using lanterns for centuries. Of the many styles of lighting used in Pre-modern Japan, we are going to look at two. These styles describe lanterns which are generally portable, at least minimally protect their firebox from external elements, and which could be available to all layers of society in 16th century Japan. Both are subsets of the larger “chouchin” family of lanterns.
Our first type of lantern is the kago-chouchin (Jpn.: “basket lantern,”) which is as simple as a bamboo woven basket with a handle and a light source contained within. There is a picture of a kago-chouchin in an issue of the journal Nihon no Bijutsu (Jpn.: Arts of Japan) that shows the construction of this kind of lantern. As we will see later, even this picture will show us a great deal of detail as to how the thing is made. The kago-chouchin design is a very old one, and would be the sort of thing that would exist all throughout the medieval period covered by the SCA. In contrast to the following design, the kago-chouchin also has the distinct capability of being set down so that it can be used held or set to the side for all sorts of lighting solutions.
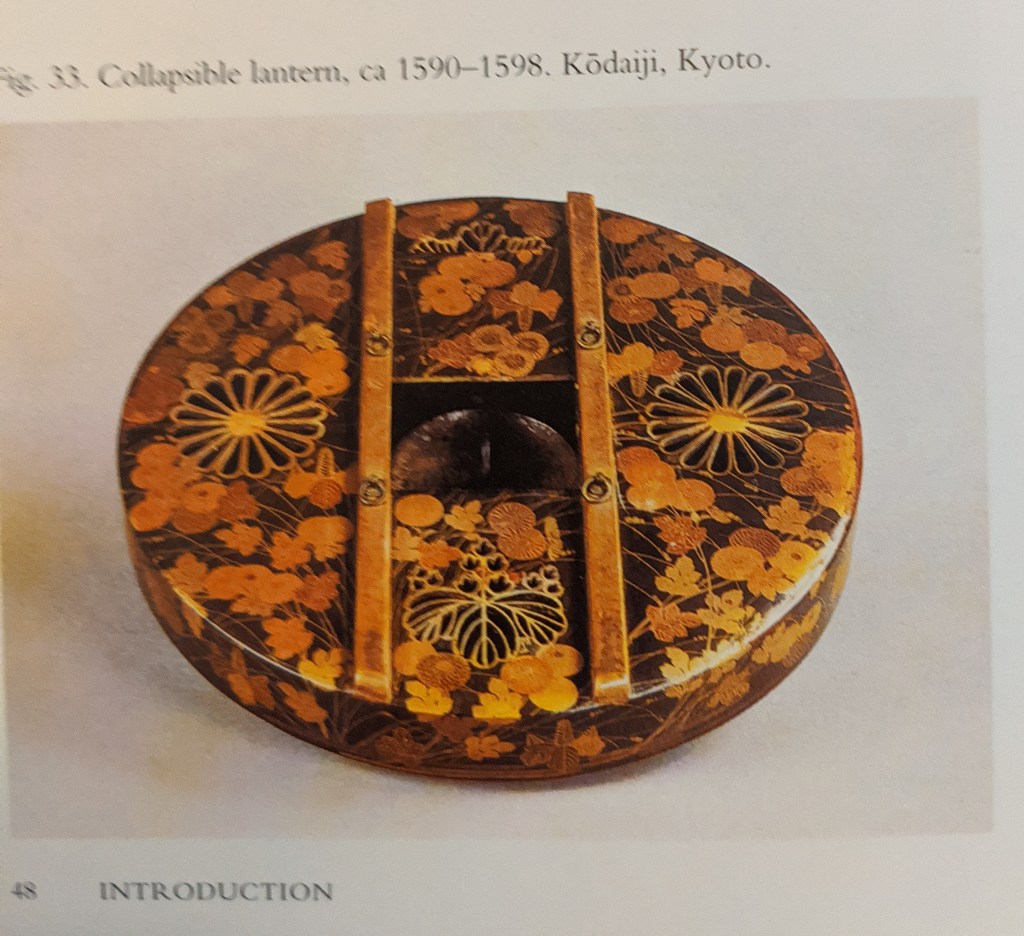
Near the end of the 16th century, a new kind of paper lantern was invented which is much more widely recognized today. The so-called hako-chouchin (Jpn.: “box lantern”) is a tall cylindrical lantern which may be collapsed down between the top and bottom sections to conserve space. These are the genesis of the standard foldable paper lantern in Japan. There is an extant lantern from the Momoyama era (late 16th century) showcased in the book “Japan’s Golden Age.” This kind of lantern is useful not only for its light, hangable weight, but also because when it is collapsed, it can be tucked into a person’s kimono for easy carrying.
The Kago-chouchin
As noted above, there is a picture of a kago-chouchin in a Japanese Arts journal. The translated caption to the picture reads as follows:
Figure 56: Kago-chouchin(Ministry of Education Museum)
A lantern from the days before there were any folding lanterns made. The firebox is contained within a bamboo basket and paper is affixed around the outside. The basket portion can be raised by hand and the candle can be lit, and then it can be carried by the handle. Made in Akita Prefecture. Total height 43 cm (~17 in.)
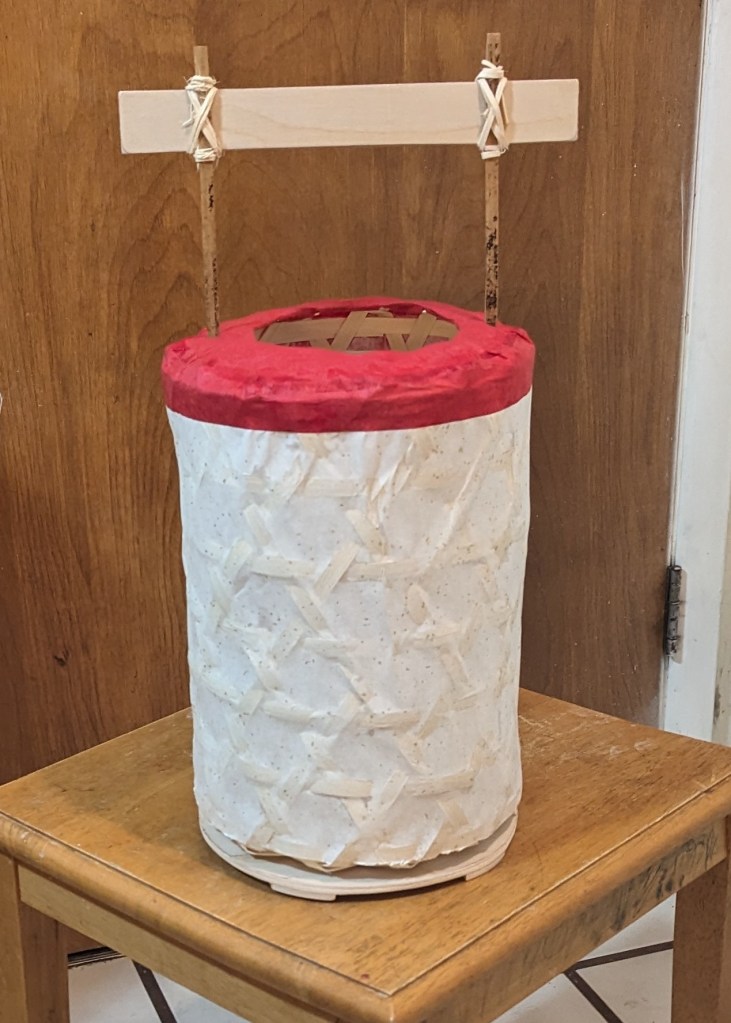
From this description and the picture itself, it was possible to sort of redact how the lantern was constructed. (Full list of observations, as well as a picture of the lantern itself, in Appendix A) This lantern is made of two parts which are intertwined when the construction is finished. The main portion is a woven basket covered in paper and the second is a handle and base which are laced through some of the holes of the basket. This is what allows the basket to be raised and lowered without removing it completely.
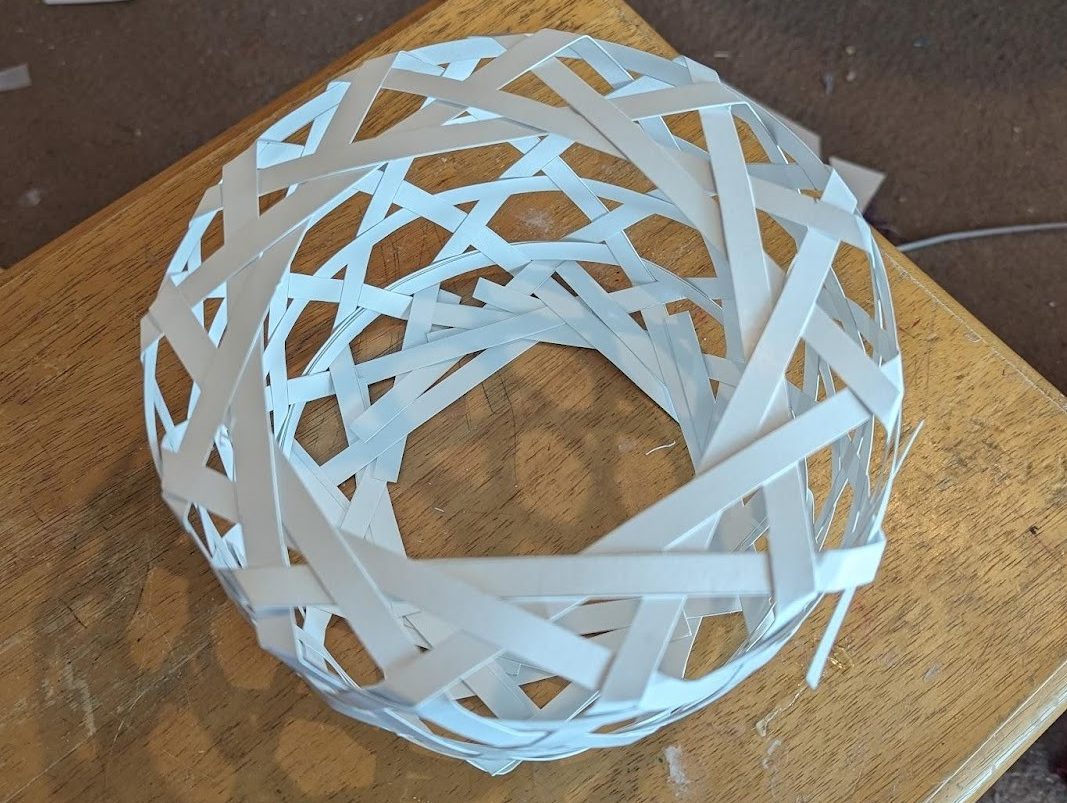
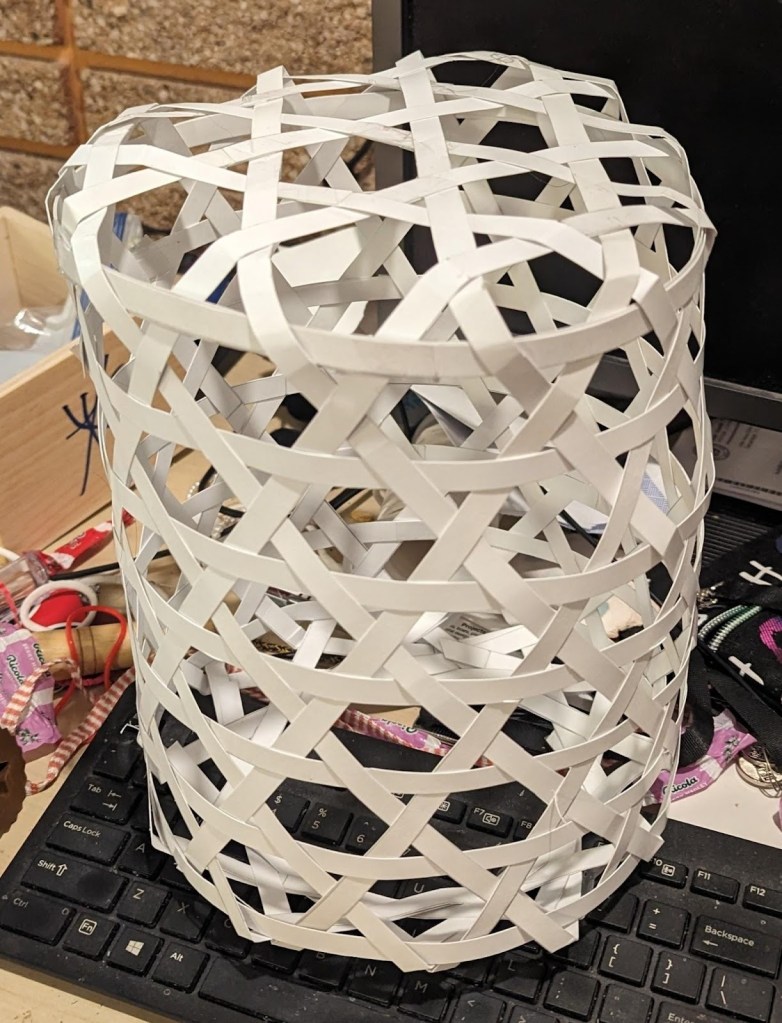
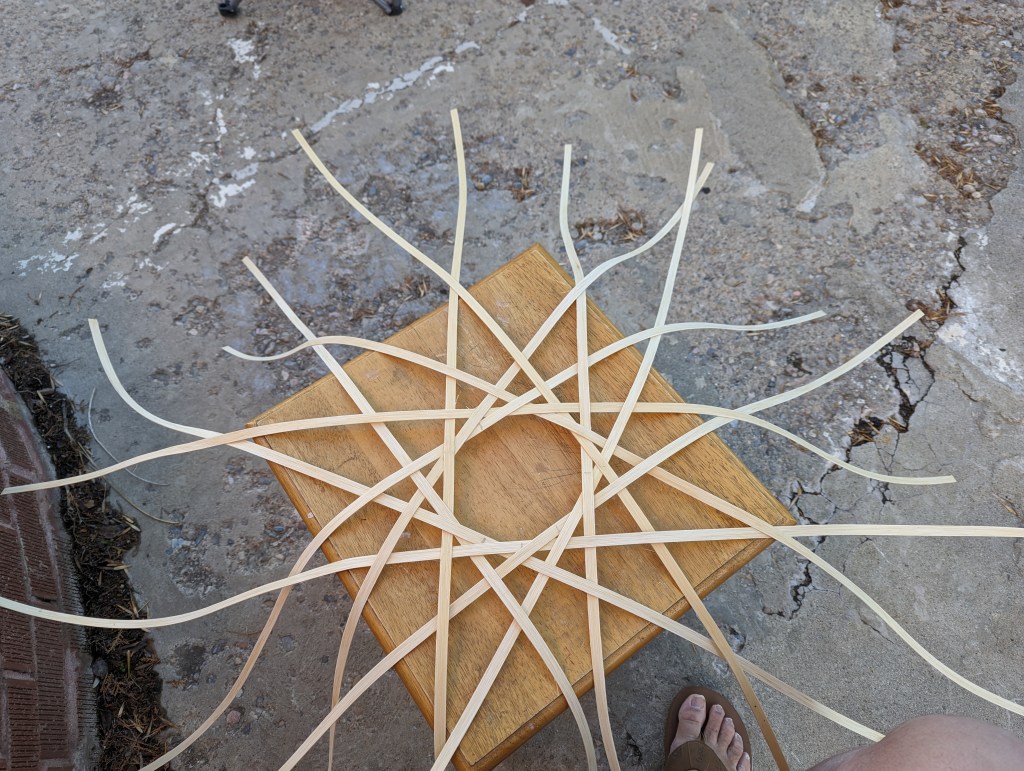
Before making the full lantern, several tests were necessary to look at the possible size a lantern might be and see how it was likely to be woven. One of the more common basket weaving patterns used in Japan is the “kagome” style of basket. In this style, strips of material (usually bamboo) are interwoven in a system of triangles and hexagons. More details about this exact basket weaving style can be found both in the construction appendices, and through other online tutorials on places like YouTube. For this lantern, while the walls of the main body of the lantern look to be woven in a kagome pattern, the top and bottom of the body both have a large hole in the center and therefore can’t be woven using that basic method. Indeed, after making a few lanterns from strips of paper it became apparent that a sort of interlaced hoop would form the bottom of the basket, which would transition to the hexagonal star weave up the walls of the basket, and then change again to the hoop design on the top of the basket. With this idea in mind, it was time to start in on the actual item.
Kago-chouchin Construction
The first difference between this lantern and its historical counterpart is that this one is made from rattan weaving cane instead of bamboo. Weaving cane is much cheaper than bamboo strips and it is much more pliable than an equivalent width and thickness of bamboo might be. In many ways this serves as a feature more than a bug as it is very easy to weave with.
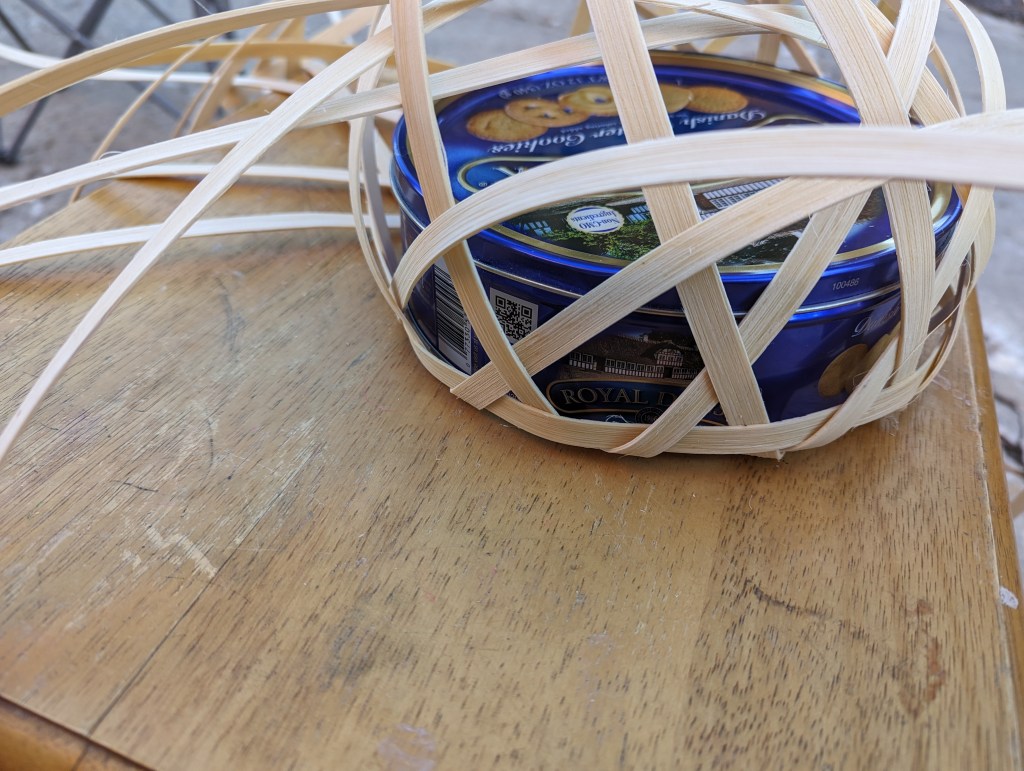
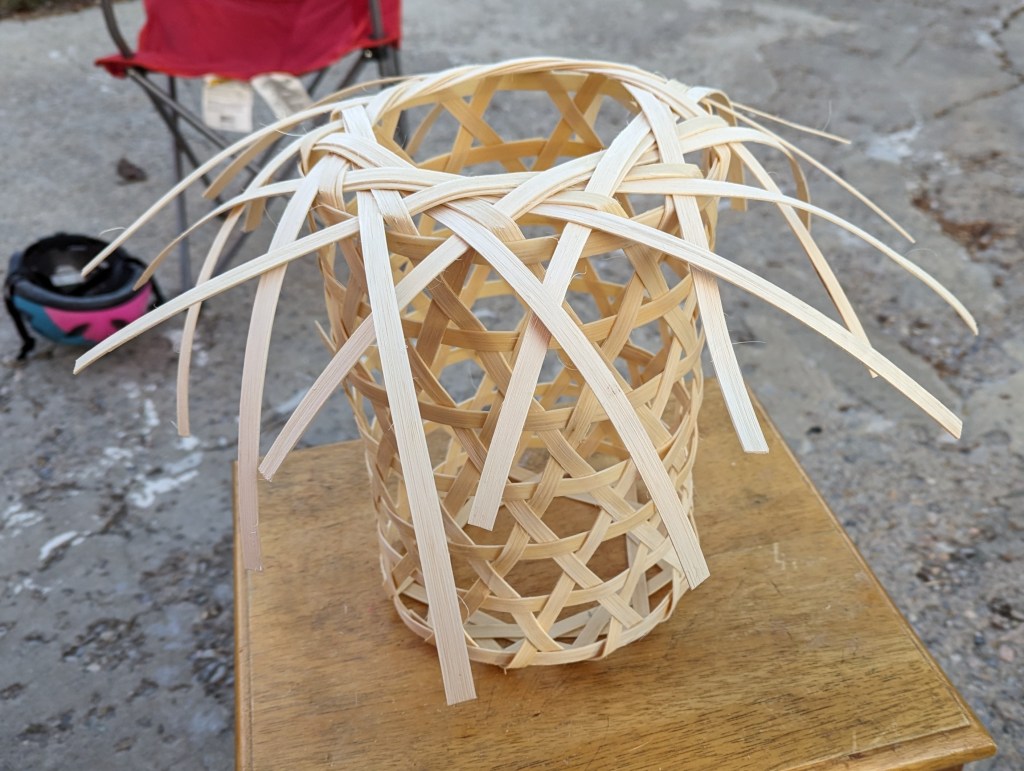
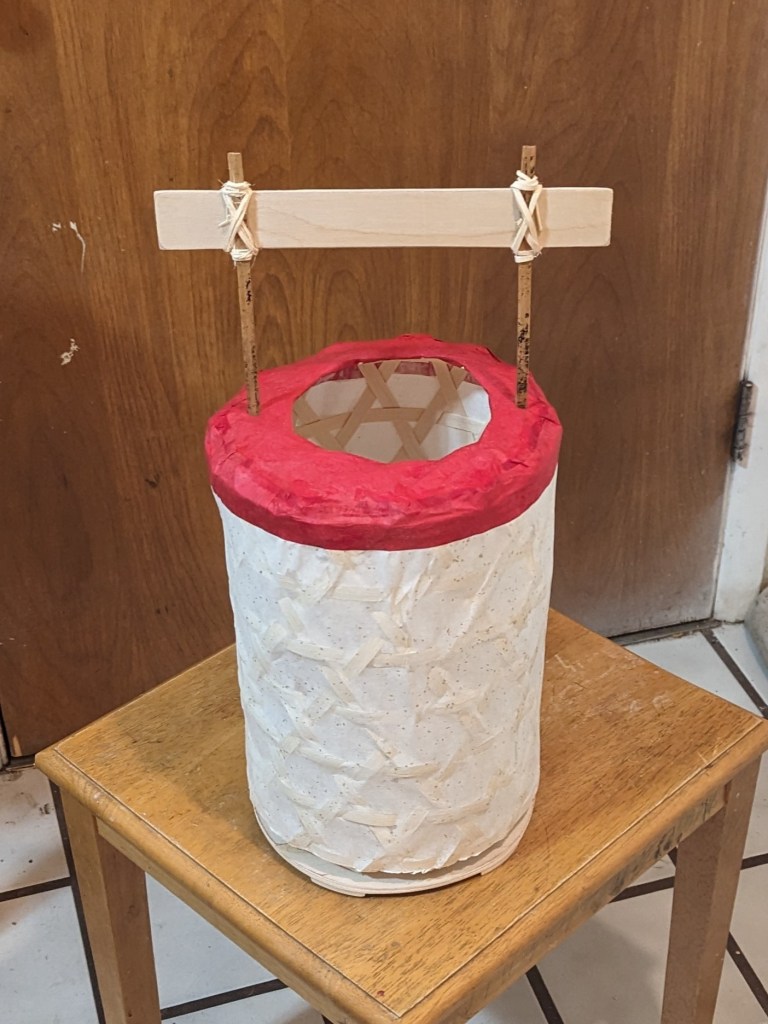
The basket of this lantern was woven by making that same interlaced hoop and then using a medium sized tin of Danish butter cookies (so-called “sewing cookies”) as a form around which to fold the reed ends and begin on making the walls, after the height of the basket passed that of the cookie tin, that form was removed and the basket was continued until it was a little more than a foot tall. From there, the reeds were bent at the top shoulder and moved back into position as another interlaced hoop. After the whole thing was dry, washi paper was glued to the outside of the frame (using basic white school glue) to make a protective covering for whatever flame might go inside and a way to diffuse light emanating from within. Historically, we would expect that the paper would be attached to the basket using a starch glue made from mashing up cooked rice, but white glue is much easier to come by these days. It can also be removed without too much difficulty if paper needs to be repaired or replaced.
The handles were made from two strips of actual bamboo with a cross post lashed onto them. Then a circular base was cut out and indentations were dug in to make places for the handle posts to connect. The posts were run through the basket and then glued into the base. Rather than a candle or oil lamp, the lantern was equipped with a small puck light which is much more convenient, waterproof, and, in this instance, controlled by remote. Obviously, this last step is a departure from expected period practice, but an electronic light is both safer than an actual flame and more useful to most members of the SCA trying to find a bathroom in the middle of the night.

While this design allows for use in many different conditions, it is not waterproof. If a person who had made this sort of lantern wanted a style that would not melt in the rain, we would expect that the paper cover could be brushed with tung oil to make the paper waterproof.
A more detailed breakdown of the construction steps for the lantern can be found in Appendix B.
The Hako-chouchin
Hako-chouchin (Jpn.: box lantern) are paper lanterns made to collapse down into the smaller, box-like ends which form the top and bottom. Usually, these do not have the internal structure to stand up by themselves, and so they are usually hanging lanterns. It is possible to have them with an external stand that connects to the top and bottom so that they hang completely on the stand, which may then be set down. Of course, as just described, the ends of the lantern are made to have the bottom nest within the top when collapsed. The top section also often includes either a hole, some pierced designs, and/or a sliding panel opening. This opening at the top allows space for insertion of a light source into the bottom section and a place for oxygen to enter the lantern when there is a flame inside.
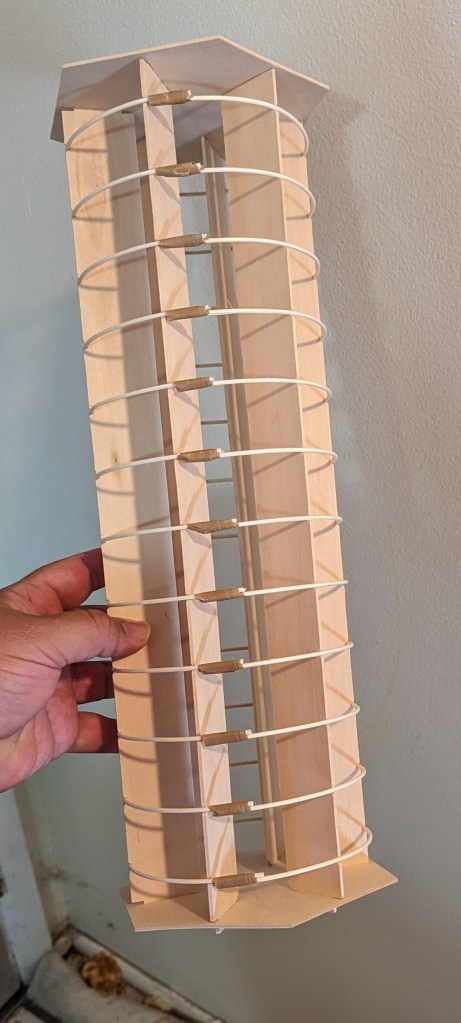
The center section of the lantern is made of thin strips of bamboo glued to washi paper to keep it place. The paper also diffuses the light from inside. There are two major schools of design when constructing this part of collapsible lanterns (whether straight sided or rounded out into a globe lantern.) One method uses rings of bamboo stacked in series and then glued to paper, while the other uses a continuous helix of bamboo strips attached end to end to create the structure. Either way, the bamboo frame is made on a jig before it is glued to paper. The jigs are themselves collapsible so they can be removed from inside the lantern before the ends are attached by means of small hooks through the box ends.
Blogger’s Note: It turns out that washi paper is not a great material to serve as the primary structural material of a lantern frame when considering long term use. A single tear can cause the lantern frame to become unusable and very difficult to repair. Further research after the fact suggests that when the lantern frame is being constructed on the jig (See Appendix C) yarn or twine can be tied onto the successive rings to create a better suspension system.
Hako-chouchin Construction
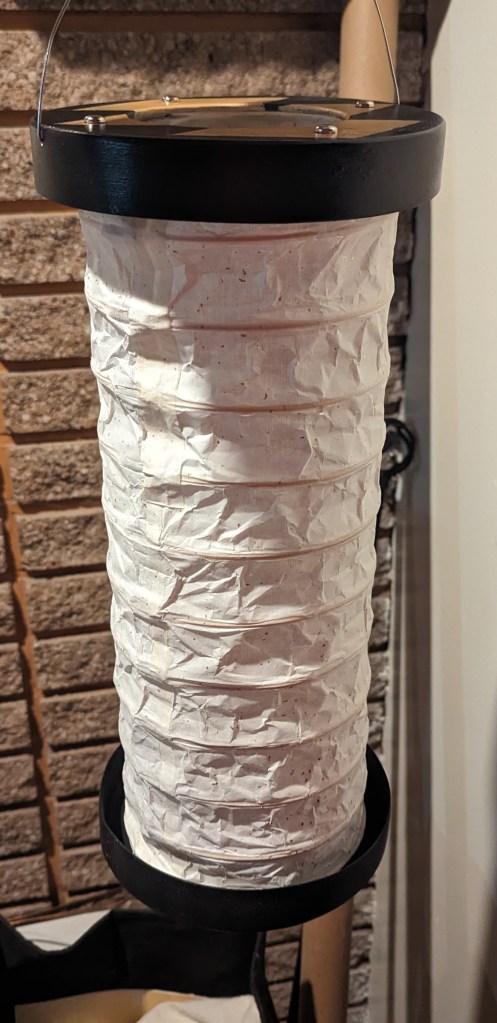
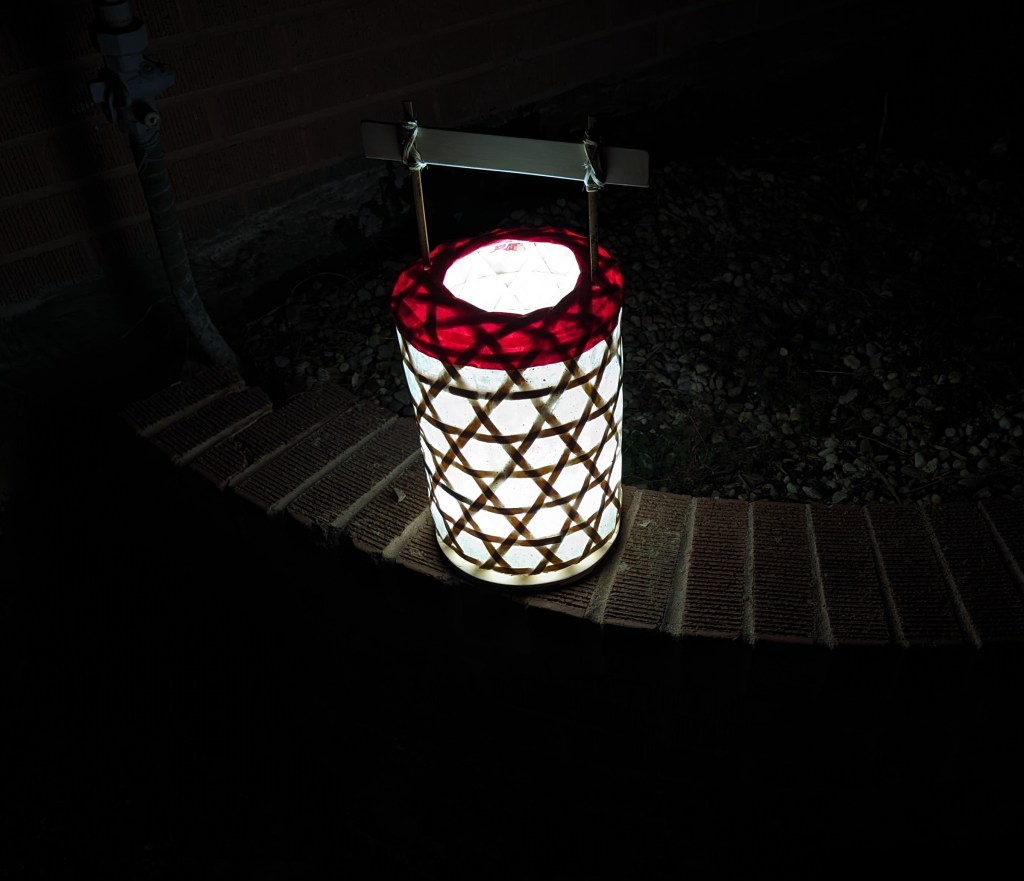
Our present example is a straight sided cylindrical lantern with ring style construction. This piece was made on a small jig made from balsa wood which was cut out on a Cricut Maker. The rings of this piece are not actually bamboo, but rather, rattan reeds. Initially the plan was to use bamboo strips, but the process of shaving down bamboo to the size needed proved difficult and frustrating. The bamboo used for the ribs needs to be pliable enough to bend around the curves of the jig, but also strong enough that it doesn’t snap under slight pressure. Furthermore, the bendability of any one piece needs to be constant along the entire length, therefore places where the bamboo strips have parts of the nodule ends in them are more difficult to work with. Presumably, it is possible to use higher quality bamboo and work it more finely to achieve the desired effect. This project is focused on creating pieces which can be easily duplicated by others who wish to make lanterns for themselves and so a more user friendly option was used. Basket weaving reed is easily obtained from Amazon and has both the pliability and strength necessary for this kind and size of lantern.
The ribs were each wrapped around the jig and secured with masking tape. Under normal circumstances, strips of washi paper and starch glue would be desirable to secure the ribs, but, again, this project is meant for accessibility. Once all the ribs were assembled, wide panels of paper were glued on and the jig was disassembled and removed from the inside.
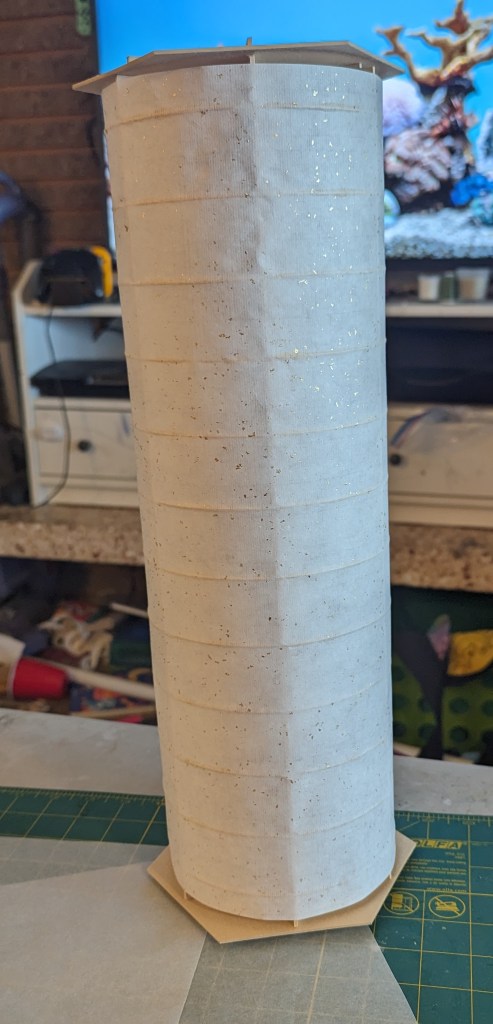
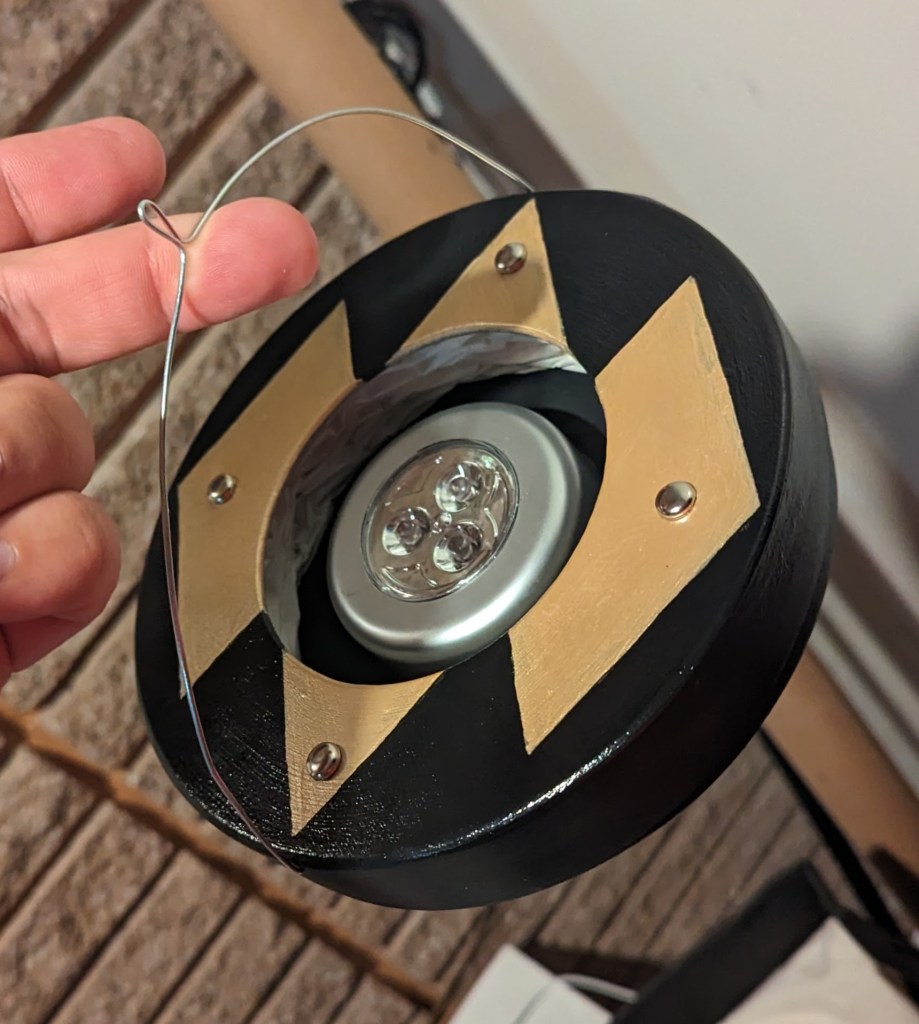
Meanwhile, the box ends had been assembled from thin pieces of balsa wood. The circular sections were cut on a Cricut and the sides are made from long strips of balsa wood which were soaked for several hours in hot water before being secured to circular forms to dry. The “steamed” strips were glued around the edges of the circles and the completed box ends were painted. Small slits were cut into the circular faces and metallic brads were fitted through to act as hooks for the paper body.

When attaching the hooks to the paper section, it is important to do the top section first. The hole in the center of the top section allows space for working with the hooks on the bottom section even after it is assembled. The hooks are folded over the end rib of the paper section and poked through the paper. Then, a short pole is used to pound the end of the brad hook down into place to secure the rib. This is done on both ends.
Finally, a semi-circle of wire was attached around the top of the lantern to make a handle, and an electronic puck light was secured to the bottom of the lantern. A simple press button light allows for ease of use in the middle of the night at SCA events.

Results
Both of these turned out very well, both in terms of form and function. The basket of the kago-chouchin slides readily up and down along the handles and the structure is sturdy but still light enough to carry. I don’t know how it would stand up to travelling in a fully packed vehicle to the SCA, but if it had been made from bamboo, I am confident it would be more than up to the task. As is, it may still fare well, but it’s harder to tell.
The paper of the collapsible lantern is strong enough to support the weight of the rest of the lantern perfectly fine. Both of these lanterns have a hole in the top and I was worried that the light coming through there might be an annoyance to anyone carrying the lanterns, but the lanterns are deep enough that someone would need to have their face almost directly over the top opening for it to be an issue. The small puck lights provide a comfortable, if not extremely bright, amount of light, that would easily be enough to light a walking path for someone walking at night. On balance, either of these lanterns seems like it would be very practical for anyone seeking a more period appropriate East Asian aesthetic to their SCA lighting needs.
Sources
- Hickman, Money L. Japan’s Golden Age: Momoyama. Yale University Press, 1996. P. 48 – picture of Collapsible Lantern
- “Kago-chouchin.” Kotobank, https://kotobank.jp/word/%E7%B1%A0%E6%8F%90%E7%81%AF-461482, Accessed 1 March 2024.https://kotobank.jp/word/%E7%B1%A0%E6%8F%90%E7%81%AF-461482
- “Mingei.” Nihon no Bijutsu, vol. 3, no 58, 1971, p. 59
- “Murata Chouchin-ya.” https://www.murata-choucinya.com/, Accessed 1 March 2024
- “【輪弧編み】かんたん輪弧の編み方 4すくい2押さえ 竹細工” YouTube, uploaded by バンクラ! 竹細工channel, 2 December 2022, https://www.youtube.com/watch?v=iAi_S4efeP8.
- “六つ目編みの分かりやすい編み方 竹細工 Bamboo craft” YouTube, uploaded by バンクラ! 竹細工channel, 13 November 2021, https://www.youtube.com/watch?v=OnxWXyFH9Dc.
Series Links
This article is one of a series about this subject. These are the individual posts.

Leave a comment