Introduction
Toshiko Ito wrote an amazing book called “Tsujigahana: The Flower of Japanese Textile Art” which examines various styles of the cloth decoration style which was widely popular during the end of the 16th century and into the 17th century. Tsujigahana is a style of decoration which utilizes the various arts of shibori tie-dye, metal leafing, fabric painting, and embroidery in various ways to produce some stunningly beautiful and intricate pieces of art.
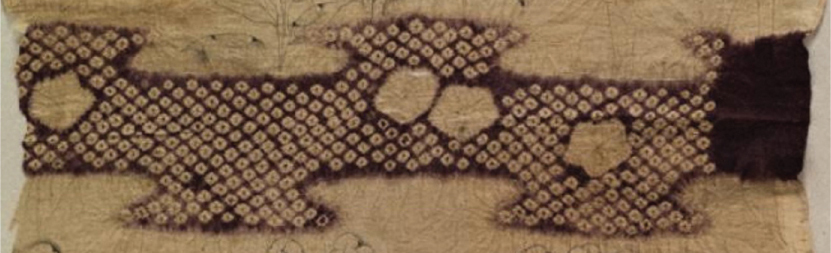
Included in the book is an image of a little scrap piece of fabric dyed with some purple lines and also painted with black ink drawings. The image itself is on page 85 of the book with a discussion of its style on pages 82-86. The high contrast of the purple waving line cutting across the white ground of the fabric gives the piece a bright and cheery feel, while the wobbly but still skillfully executed line drawings produce a feeling of “effortless effort” very common in the wabi-sabi school of aesthetics. This little piece of cloth stands as a refreshing departure from a lot of the grand reds and gold common on many clothing designs of the period and while it utilizes a strong purple color, it is not as overwhelmingly purple as some other examples.
As of this writing, it turns out that this same piece is featured on the Japanese Agency for Cultural Affairs website, the Cultural Heritage Online database.
https://bunka.nii.ac.jp/heritages/detail/196628
Looking at this site also leads to the Joshibi Women’s University Art Museum where the piece itself is housed.
https://jmapps.ne.jp/jam/det.html?data_id=1732&data_idx=0
The value of the University’s online collection is twofold. Because the online collection provides the dimensions of this little scrap of fabric and because the website provides the ability to zoom in on the image it is possible to do some in-depth analysis on the size and layout of the decorations of this piece of fabric.
Let’s take some time to consider the details of this piece and what techniques were likely used in its creation. By better understanding this single piece, we can cultivate a larger general understanding of Japanese clothing decoration which will help us in understanding other works of art from this same time and place.
Description
To begin with, we are calling this particular piece a “scrap”. In this case, scrap (JPN: “kire”/裂) is a technical term referring to the fact that this rectangle of fabric is only a piece cut away from a larger piece of fabric, which was itself probably part of an entire sewn garment. In Ito’s Tsuhjigahana, one page shows our piece of fabric and then the next page shows another piece of the same fabric, which is held in a different collection than the one we are examining. Clearly there is more of this fabric still extant than just this single scrap. This isn’t entirely unexpected. We do know that used clothes and cloth would often be donated to Buddhist temples where it might be cut up and repurposed for any number of uses, including altar cloths or curtains.
In any event, our scrap is a rectangle of silk measuring 29.3 cm wide by 31.5 cm tall (about 11.5” by 12.5”). We can see that the right side of this scrap has a section that looks to be a seam allowance from when it was sewn together with other pieces. Furthermore, the top and bottom edges of the fabric are unfinished as if they were cut or torn from the rest of the fabric. Meanwhile, the left side of the fabric shows a similarly ragged edge to the top and bottom. This piece may have also been torn away or cut on a pulled thread line, but a couple of little “tails” of fabric suggest that this area may have been cut unevenly with scissors. These cut and ripped edges are part of how we know that this scrap was previously part of a larger piece. This 29 cm width is a little bit narrower than we would expect from a full woven “tan-mono” bolt of the same time period, but that cut edge on the left side explains this pretty well.
The mostly white silk ground is broken up by a purple colored wavy bar running across the center of the field. The bar itself is decorated with a field of little squares called “kanoko” and some scattered five petal flowers. Above and below the bar section we can see two scenes painted with ink lines and some light shading. The top section shows some hydrangeas and a lily flower on the left side with some strands of grass providing a background. The bottom area spreads out a peaceful countryside scene for us where some huts are scattered among misty mountains along with some trees and a rural road in the lower left.
The CHO listing for this scrap says that it dates to the Momoyama period, or the later half of the 16th century.
Purple Bar In-depth
Design and Layout
Purple Bar
A purple colored bar with undulating borders runs horizontally across the center of our silk scrap. The edges of the bar wander back and forth similarly to what European heraldic experts might call a nebuly/nebulee line shape.This pattern is common in Japanese art and design where it represents the edge of a cloud or some mist. The area revealed behind the mist is usually a scene or design of some kind. In this way, these clouds function like the gutters of a comic book, where they separate visual areas but suggest some connection between them. This is commonly seen in pieces like painted folding screens. In the present piece, the wavy lined bars create borders between various scenes which have similar thematic elements, as we will discuss more below.
In fact, if we look to the bottom of the scrap, we can see the very top of another undulating bar.
We can presume that whatever piece of clothing this fabric was originally part of was organized into several wide tableaus with evenly spaced purple bars between them. We can see that the place where one bar undulates upward is vertically aligned with the same undulation on the next bar. This means that any two bars match with each other in their up and down rhythm, rather than being offset or randomly placed. This would give the larger garment a steady sense of evenly spaced bars rather than a constant expanding and contracting feel that might happen with an offset rhythm.
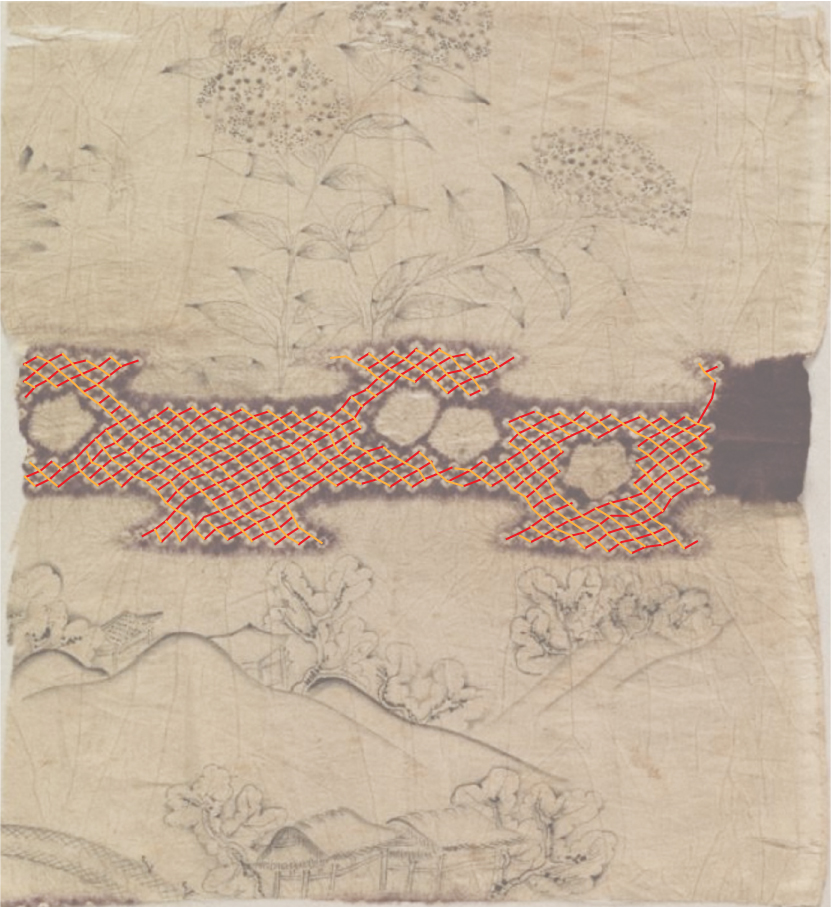
As mentioned at the beginning of the article, having exact measurements on the piece means that we can determine the space and arrangement of various elements on the scrap. The below graphic gives measurements for several elements of the bars on this scrap. We can see the overall bar width, the space between bars, and the horizontal space between upward and downward undulations.

Gridded Squares
All along the bar a field of squares arranged in a diagonal grid provide significant visual interest and prevent the purple bar from being overpowering to the rest of the design. These squares are interspersed with a few larger white spots meant to represent five petalled flowers. These small squares, meant to visually evoke the spots on the fur of young deer, are only about the size of a pencil eraser. Measuring from center to center of these squares shows that they are only about 5 mm apart from each other, diagonally.
Although these squares are arranged into a general grid shape, we can see that that grid wanders about fairly significantly. The technique for making these squares is a kind of tide-dye called kanoko shibori. We will discuss the method in greater detail below, but for now we will say that this lazy grid look is a result of (purposefully) not planning out the exact positions of dots ahead of time. The artisan who bound these squares did so in an ad hoc series of diagonal lines in order to fill up the space inside the bar and move the design around the flower motifs. The below image shows more clearly how the grid spacing wanders around throughout the design.
It may seem odd that a design which could be so easily planned for ahead of time would be left to, essentially, the vibes of the artisan making the work, but it is apparent from the final product that the final product does not lack any display of skill in either design or execution. In fact, these sorts of purposeful and positive aberrations are part of the reason that Tsujigahana styles remain compelling 400 years after the fact. The story of Sen no Rikyuu’s son sweeping a garden path perfectly clean and then scattering a few leaves around reminds us of the theory of wabi sabi aesthetics where a little bit of natural happenstance can make a design all the more beautiful.
How is it Done?
The process of making a complex design like this one is not random. The design is planned out well ahead of time and all the steps required to make a design like this may not be apparent just from looking at the final product. Below, we will discuss the techniques for putting together each of the kinds of decoration on this fabric, but it may be helpful to have an idea of the overall order of operations of this production. This list presents a probable order of production processes in relation to each other.
Order of Dyeing Processes for Purple Bar
- Starch sizing is applied to the entire bolt of fabric and the long strip of fabric (tan-mono) is left to dry stiffly.
- Lines to mark the wavy edges of the bars are either drawn by hand or traced in a stencil.
- Five-petal flower designs are drawn or traced onto the fabric.
- Running stitches for the bar edge and flower outlines are sewn.
- Kanoko dots are twisted and wrapped.
- Fabric is washed to remove both aobana (temporary ink) lines and unneeded starch.
- Flower designs are cinched and wrapped in bamboo sheaths.
- Bar edge lines are cinched.
- Fabric is secured inside a bucket with the durable portions left out of the sealed area.
- Fabric is dyed purple. Probably with suou/sappanwood
- Fabric is rinsed of excess dye.
- Kanoko dot wrappings are pulled out and cinched areas have their threads snipped.
- Fabric is pressed and steamed to secure dyes on fabric.
- (Hereafter is the process for ink drawing.)
Planning
Even if some of the design elements on this scrap appear fairly randomly placed, a piece like this requires some fairly rigorous layout ahead of time in order to create a beautiful and cohesive final product. For a garment like the one that our scrap comes from, fabric might be cut up and loosely baste stitched together. Sizing, a substance used to stiffen the fabric, might also be applied to make the fabric easier to mark. Designs would be drawn onto the fabric with a brush and aobana (青花) ink. Aobana ink is a fugitive ink, meaning that it can be easily washed out from the fabric, made from flower petals. Artisans might either freehand some designs, or use a stencil to quickly mark out patterns. In this case, we would expect that the bar borders and the flowers would be marked ahead of time, while the squares are done freehand, and the ink drawings come in a later process. After the designs have been laid out, the garment is taken apart so that the individual pieces can be decorated.
Bōshi Shibori
Bōshi shibori is a method of tie-dyeing where sections of fabric are tied off and resisted with some kind of covering, or “cap” (JPN: 帽子/ bōshi) before dyeing. The resisted areas don’t take any dye and remain the color they were before the dyeing. For both the line edges and the flowers on this scrap, the edges of the resist areas were sewn with a simple running stitch. Then the running stitch is cinched up and the resist areas are covered. Historically, we would expect that the resist coverings would be made of something like bamboo sheaths, the leaf-like growths around young bamboo shoots, or kelp. More modernly, stretchy vinyl sheeting is often used. However, even something simple like pieces cut from sandwich bags, plastic grocery bags, or cellophane/plastic wrap can serve as a great resist cap. The cap material gets put over the resisted section and secured on by further thread wrapping and tying. The area around the border cinch needs to be very tight on both the fabric and the cap so that no dye seeps into the resisted area.
Historically, the thread used to sew the border running stitches would be made of hemp. The hemp thread is doubled up for sewing to ensure the strength of the thread when it is being cinched tightly. Hemp is particularly useful in this regard, because when it gets wet, such as when the fabric is washed before dyeing and in the dye bath itself, hemp will contract and further tighten the seal around the resisted sections.
Often, the length of a line of resist border is simply too long to allow just cinching to create enough of a seal to stop dye from spreading where it is not wanted. In these cases, the resist edge is cinched around a plug to stop dye from entering. Modern plugs can be made from rolled up paper, but historical ones were probably made from wood. Some of the supplementary videos at the end of this article show how fabric might be wrapped around a disk shaped plug for larger sections of fabric.
It is interesting to see the ingenuity with how resisted areas are planned in the case of this scrap. For the bars themselves, a line of stitching would be sewn at the edge of the bars and then it isn’t the bars which get bound up, but the area between the bars. Then the flowers are cinched and bound into little bulges within what will later be the purple ground of the bars. This kind of back and forth thinking between negative and positive space is central to bōshi shibori dyeing.
The book Shibori: The Inventive Art of Japanese Shaped Resist Dyeing, by Yoshiko Wada gives a highly detailed set of instructions on bōshi shibori on pages 88-97, including even more information than is discussed here.
Kanoko Shibori
Kanoko (JPN: 鹿の子/ kanoko/ young deer) shibori is a method of creating many small resisted squares on a diagonal grid. While bōshi shibori is made by sewing lines to border the resisted areas, kanoko spots are created by folding the fabric and wrapping it very tightly with thread. When the thread is removed after dyeing, what looked to be a solid area of color is revealed to be a field of texture and pattern.
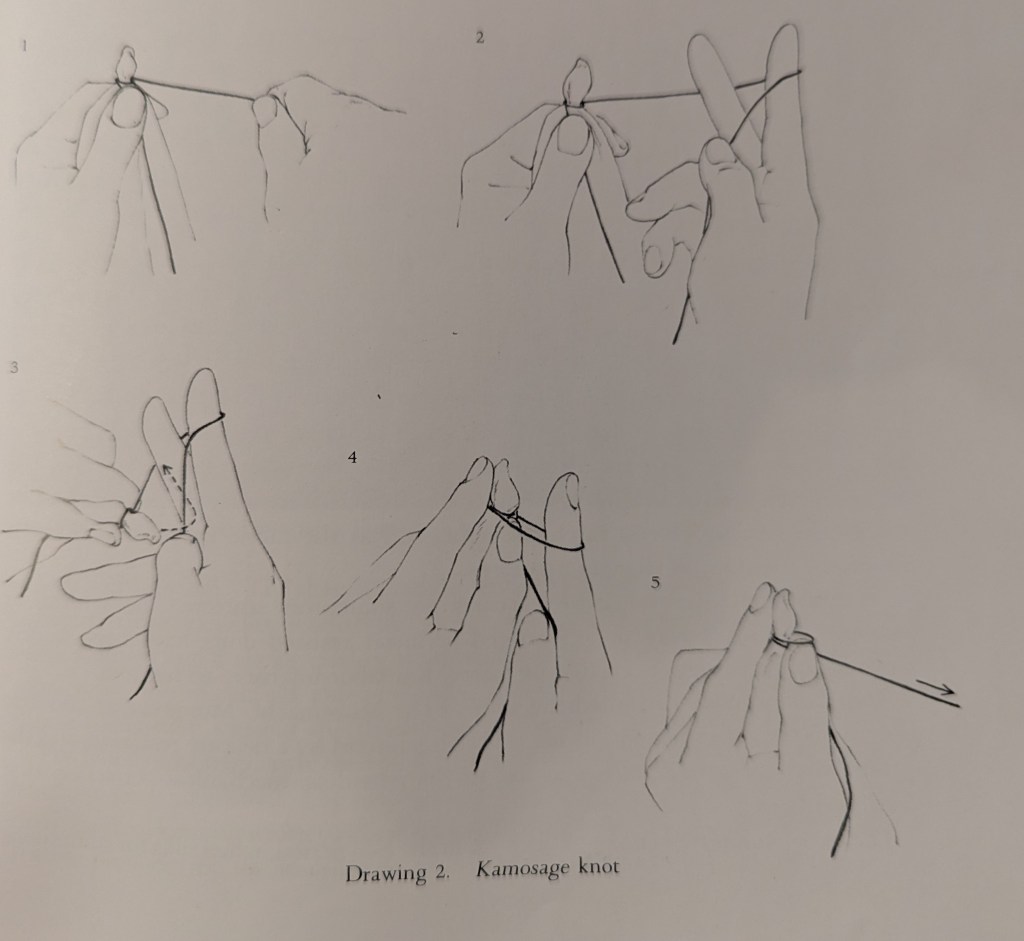
Individual squares of kanoko are made quickly and simply. First, a small section of fabric is folded in half along the bias grain of the fabric and then folded in half again on the other grain bias. This creates a little folded pucker of fabric which is wrapped several times (usually 3-5 times) with the binding thread. These threads are placed very closely together so that no dye will penetrate between them. Then, a simple knot, called a kamosage knot, is tied with one hand around the wrapped section. Then, the next small pucker is folded and wrapped, and so on. Many repetitions of this process creates the large fills of gridded squares.
The artisan who makes the squares works in successive diagonal rows. The first row of a pattern will be at the bottom right of a filled area and will go from the bottom left of that row to the top right. After all the squares from one row are tied, the artisan moves to the next row, which is to the upper left of the previous one. Because the exact positions of the squares are not marked out beforehand, a lot of skill is required in making fairly parallel rows with consistently sized squares. However, one of the advantages of not planning exact squares ahead of time is that an artisan can “nudge” the direction of a line around to allow space for it to interact with other design elements. We can see how natural variation in the squares of this scrap allow it to subtly wrap around the flower motifs. In this way, an artisan can create a visually pleasing design that fills an entire space, even if it doesn’t live up to mathematically perfect ideals of placement.

When dyeing is finished shibori needs to have its threads removed to reveal the resisted design. While bōshi shibori and various sewing resist methods require snipping the threads themselves, kanoko shibori can simply be pulled apart. The wrappings around the resisted sections are only kept on by tension and when the fabric is pulled apart diagonally, it slips out of the wrappings. This process is simultaneously nerve wracking and incredibly satisfying as a chorus of little pops of fabric shows the full result of an artisan’s painstaking work.
Wada’s Shibori book gives instructions for kanoko shibori, under the heading “Dots Within Squares”, on pages 58-62.
Ink Drawings In-depth
Design and Layout
Between the rivers of purple, this fabric is decorated with a variety of scenes. We are going to look at the two which appear on our scrap here, but (as mentioned above) another scrap of the same fabric is contained in Ito’s Tsujigahana. Our scrap shows a scene of several flowers in a field and another of some mountainside huts. The other scrap, currently held by the Kyoto City University of Arts, has several cranes flying over some farm fields, and a depiction of some abandoned ox drawn carts. We can imagine that whatever original garment these scraps belonged to, the whole thing was a canvas for many different scenes. These ink drawings elevate the visual interest of this piece so far beyond just a set of repeated patterns. The wearer of this garment must have appeared as a walking working of art.

Hydrangea and Lily Flowers

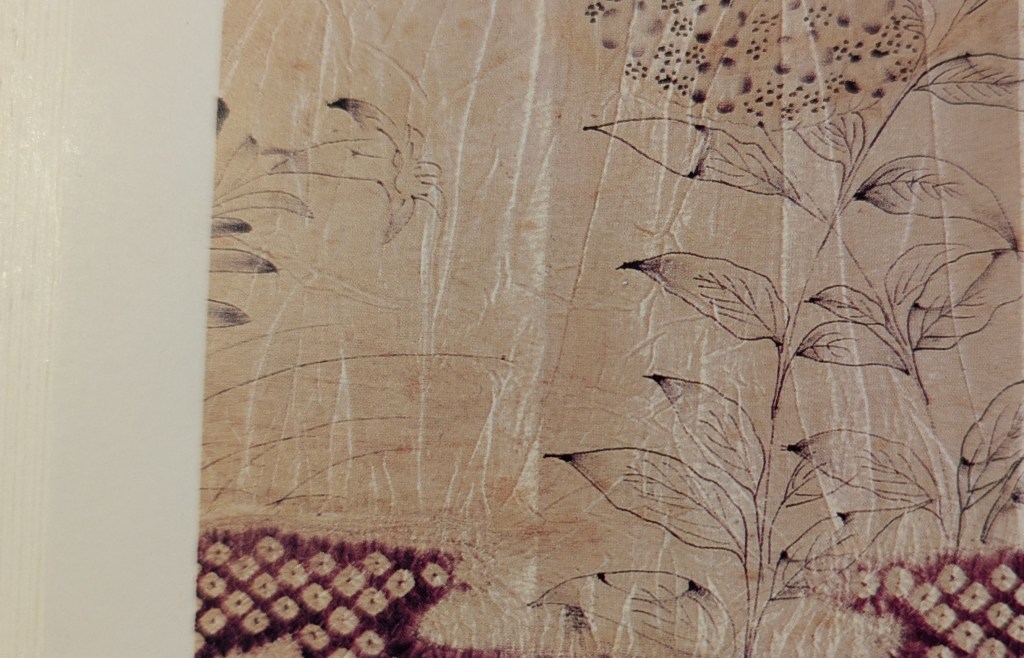
For now, though, let us consider the scenes on our scrap in particular. Above the bar we see a collection of several hydrangea branches with a lily flower off to the left of the fabric. The main flowers here can be a little difficult to identify but we can be confident that they are indeed hydrangeas, given that the CHO listing for this piece identifies the design as “ajisai” flowers (JPN: 紫陽花/ ajisai-bana/ big leaf hydrangea). These flowers are all drawn in ink and lightly shaded. The drawing looks fairly realistic, with the leaves of these flowers showing their veins and the edges having a wobbly quality to communicate their delicate structure. These are not quickly drawn lines meant to suggest a run of the mill “leaf”. Instead, these are supposed to be identifiable as hydrangea leaves specifically. Although, incidentally, these leaves are probably smaller than we might expect on a sprig of the “big-leaf” variety. The bunches of flowers on these hydrangeas are arranged into oval shaped groupings, instead of face-on circles. There is a differentiation between large and small blossoms within these groupings. Large blossoms have five petals delicately shaded in a pentagonal pattern. Smaller blossoms are collections of dots with one central dot surrounded by five or six others. These are interspersed between the large blossoms to fill out the space and suggest the overall ovular shape.
On the left side of the scene we can see the delicate shape of the lily flower with its long, bent back petals. Oblong leaves just barely peak over the ragged left edge of the scrap. Perhaps there were more flowers there originally.
It is very hard to pick out on the Joshibi image, but some spidery thin lines between the lily and the hydrangeas denote some bent over grass. It is likely that we are meant to conceive of these flowers as growing in a field or garden. They are not just abstract flower patterns floating in empty space. The scenes on this fabric, both this scrap and the other, are meant to be grounded, even given the ample negative space in each of them.
Mountain Huts
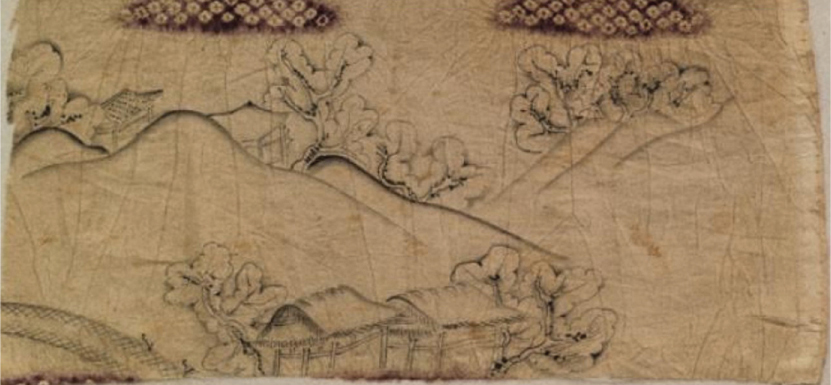
Below the bar our eyes are drawn into an isometric-view scene of several huts scattered among mountainous terrain. In the foreground of the drawing we see a pair of simply constructed huts. Perhaps they are meant for mountain hermits or bamboo cutters. The roofs of these huts are drawn with hatched lines to indicate straw thatching. On either side of this group of huts is a tree of indeterminate type. We can only tell that it generally reaches upward and is filled with foliage. Little black dots up and down the trunks probably indicate moss. Interestingly, it is the outside of the tree foliage which is shaded here. To the left of the huddled huts and trees, a small rural road forms an arch filled with cross hatching. Two little squiggly lines on the top of the arch stand in for some saplings.
Behind the huts is a “mountain range” with three peaks and gently descending slopes. These mountains reveal behind them another two buildings and several of the same kinds of trees as we saw before. These buildings are probably not the same kinds of huts as in the foreground. One has a roof drawn with rows of dots giving the impression of a proper tiled roof. The roof of the other building is harder to identify. It is neither the rows of tiles, nor the rough thatching of the hermit huts.
Finally, farther back in the distance we see another few slopes giving way to another copse of trees. Looking at both sets of mountains for comparison, we see that the closer mountains have darker lines along their silhouettes than the more receded ones. This greying out of the farther mountains serves as a basic atmospheric perspective, where the farther mountains are slightly obscured by mist. This misty erasure of forms is a common occurrence in both Japanese art and Japanese life. Japan’s high humidity and mountainous terrain are an excellent recipe for large cloud banks which seem impenetrable one minute and are gone as soon as the sun comes over the peaks.
We can look at some heavy comparison and contrasting points between this mountain scene and the hydrangeas above. While the hyndrangeas are rendered almost as if they were meant for a textbook illustration, the mountain scene is much rougher in its execution. The lines of the huts are not at all straight and the mountain peaks are simply smooth rolling lines. The trees are not identifiable as any particular type and the shading is much less about realistic description of forms. Overall, this is clearly a more iconographic scene. It is meant to evoke the feelings of misty mountains and isolated hermits than actually show them. Still, because both scenes are drawn with this limited palette of colors (just grey) and simple shading techniques, they still maintain a good visual harmony. Neither one severely dominates over the other.
How is it Done?
The ink drawings on this fabric can really only be executed after all the dye work is done. Let’s put together another list of operations before we dive into a discussion of the techniques themselves.
Order of Ink Painting Processes
- Fabric is pressed flat.
- Sizing is reapplied to the fabric.
- Grey layers of ink are applied to the fabric.
- Dark lines are drawn onto the fabric.
- Sizing is washed out of the fabric.
Fabric Preparation
While the fabric to be decorated should be flat, the individual step of pressing fabric may not be entirely necessary. The application of liquid sizing, either by brush or in a vat may accomplish this task on its own. However, shibori dyeing can leave a fabric with significant wrinkles and folds. Generally, these should be taken care of before the painting process begins.
A new coat of sizing does need to be applied to the fabric to prepare it for painting. As mentioned previously, sizing will help the stiffness of the fabric. Along with this, the new sizing must be of a kind that will react with the ink itself to make it permanent on the fabric. Sizing made of soy milk serves this dual purpose very well.
Ink Painting
Japanese sumi ink is what is called a “lamp black” or “carbon black”. This kind of pigment is made by harvesting the soot or charcoal produced by burning plant matter and mixing it with a binder, such as animal fat or gum arabic. When sumi ink is made, it is pressed into a stick of dry ink which is stored until it is ready for use. Then the ink stick is ground on an ink stone and mixed with water. Different shades of grey can be achieved based on the ratio of ink to water in a mixture.
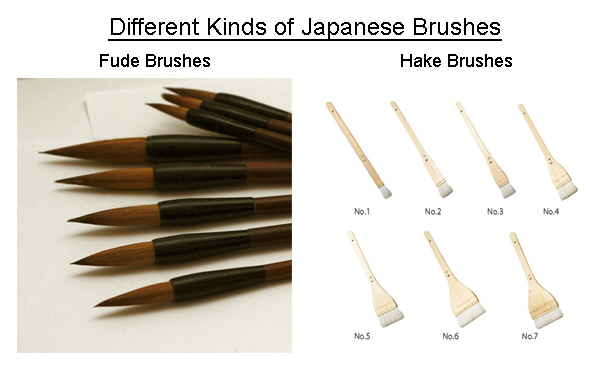
For this kind of fabric decoration, layers of shading are built up by laying down progressively darker layers of shading. The final lines are emphasized by painting blacklines over the grey work. While clean sharp lines are created by using fude (JPN: 筆/fude) style brushes, soft edge areas are filled in with small hake (JPN: 刷毛/ hake) brushes. These soft areas can be done freehand but are often also done using stencils. The value of stenciling is that one side of an area can have soft, blurred edges while the other has a sharp cut off. The explanatory videos below show an example of this kind of stencil being used. Modernly, we see artisans using clear plastic stencils, but historically paper soaked with smoked persimmon tannins would be used.
Larger Take Away
This scrap is roughly a square foot of fabric. However, contained herein is a wealth of examples of artistic skills and techniques. By taking time to carefully consider the details of this piece we can broaden our greater understanding of Japanese clothing decoration styles. On this scrap we see at least two different kinds of shibori and two different styles of painting. Next time we look at a piece of cloth or clothing that seems similar we can ask what similarities and differences are present. For example:
- Does this piece use shibori?
- Does it use a different technique?
- What kinds of shibori does it use?
- Does this require multiple dye baths?
- Are the design shapes the same?
- Was this probably done with a stencil or freehand?
- Can this be made using a similar order of techniques?
- What motifs are on here?
- Do these designs have a culturally important meaning?
- How big are the decorations here compared to other pieces?
- Who was this piece made for?
- Who would wear this?
- (For the aspiring artist!)
- Could I make this?
- How would I go about recreating this?
Understanding how this piece is made lends general understanding to how other pieces may have been constructed as well.
Here are some examples of other tsujigahana pieces. How are they the same or different from this piece?
- Hanpi with Butterflies
- Red Jinbaori
- Dobuku Coat with Paulownia Crests
- Kosode with Flower and Bird Patterns
- Kosode with Blocks of Plants
- Scrap with Wheels and Flowers
- Dance Costume with Lion Rondels
Bibliography
- Itō, Toshiko. Tsujigahana: The Flower of Japanese Textile Art. Kodansha International, 1985.
- Wada, Yoshiko Iwamoto, et al. Shibori: The Inventive Art of Japanese Shaped Resist Dyeing: Tradition, Techniques, Innovation. Kodansha USA, 2011.
Post Script
This article discusses several techniques which can be better understood if a demonstration is shown. Here are a few links to videos of the discussed techniques. These are from the Youtube Channel for the Kyoto Dyer’s and Weaver’s Cultural Association. They are in Japanese and a couple do not have any sound at all.
- Aobana Guide Drawing
- Aobana Stencil Layout
- Sewing Shibori Stitches
- Wrapping Kanoko Spots
- Wrapping Bōshi Shibori
- Laying out a Stencil to Shade
- Shading with a Stencil
- Fine Line Drawing

Leave a comment