The History
Some of the earliest extant Japanese textiles are decorated using painting (kaki-e), and the technique has remained in use in various forms through the present day. This article will primarily discuss sumi ink painting, but we also see colored pigments in some contexts. Pigments seem to have been less commonly used than ink, likely due to the flaking issue evident in the dragon coat below. Dye thickened using a seaweed called funori may have also been used for painting, but I have not found extant examples to demonstrate that.
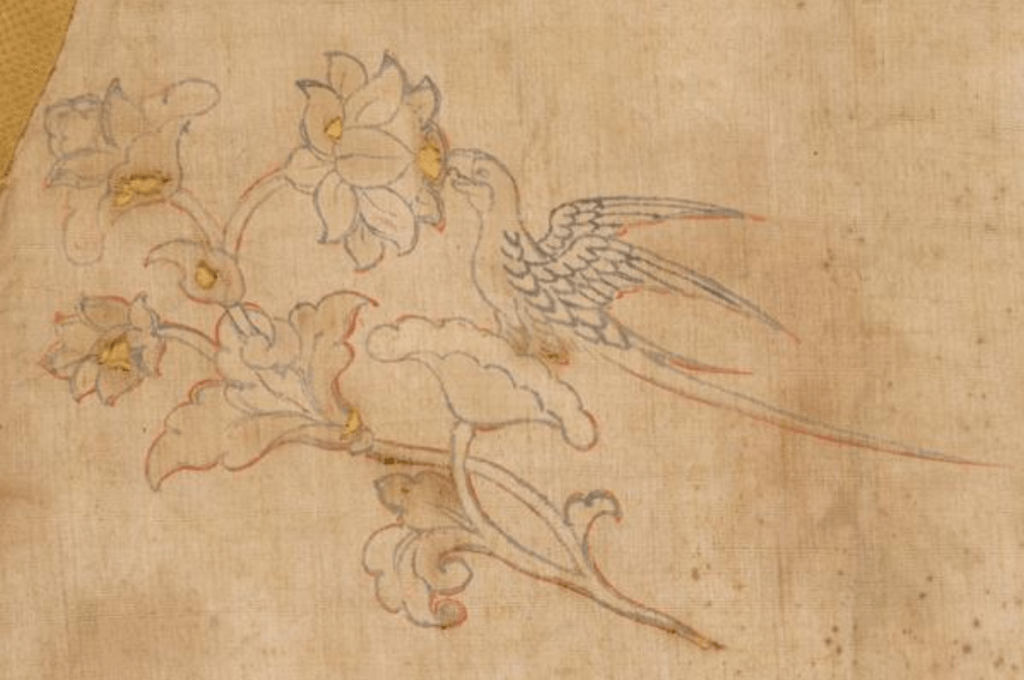
This Nara period garment, called a hanpi, features a motif of flowers and birds rendered in multiple pigments and gold paint. The full garment as well as other early painted textiles can be viewed on the Shо̄sо̄in website.

Heian period garments featuring hand painting included the mo, a train worn with women’s formal court attire. Image from the Kyо̄tо Costume Museum.

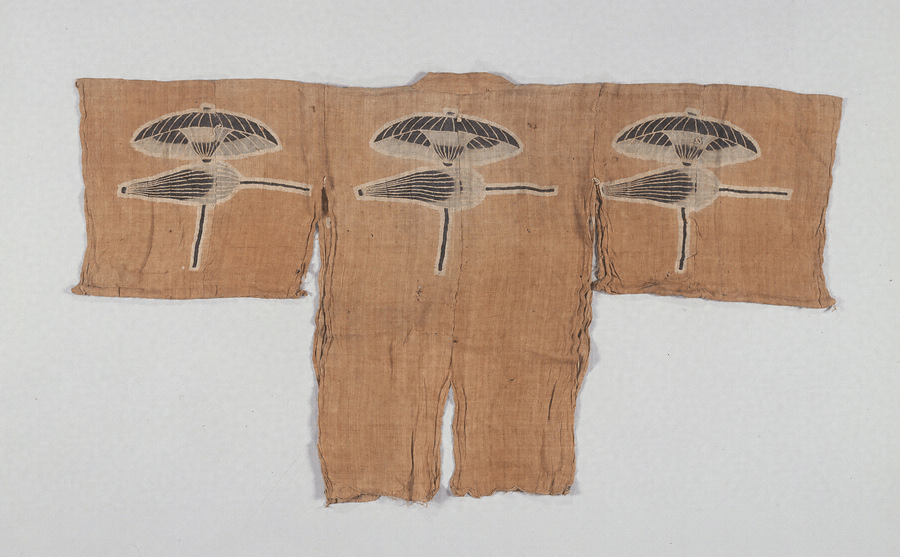
This Muromachi period garment uses block-printing, known as ban-e (蛮絵袍, ‘barbarian printing’). After the ink was block-printed, the red pigment and gold leaf accents appear to have been added using hand-painting. Ban-e was uncommon in everyday clothing, being primarily used for performance costumes, furnishings, and uniforms such as this one. Here, the design indicates which guard unit the wearer belonged to.
Image from the Tokyo National Museum.

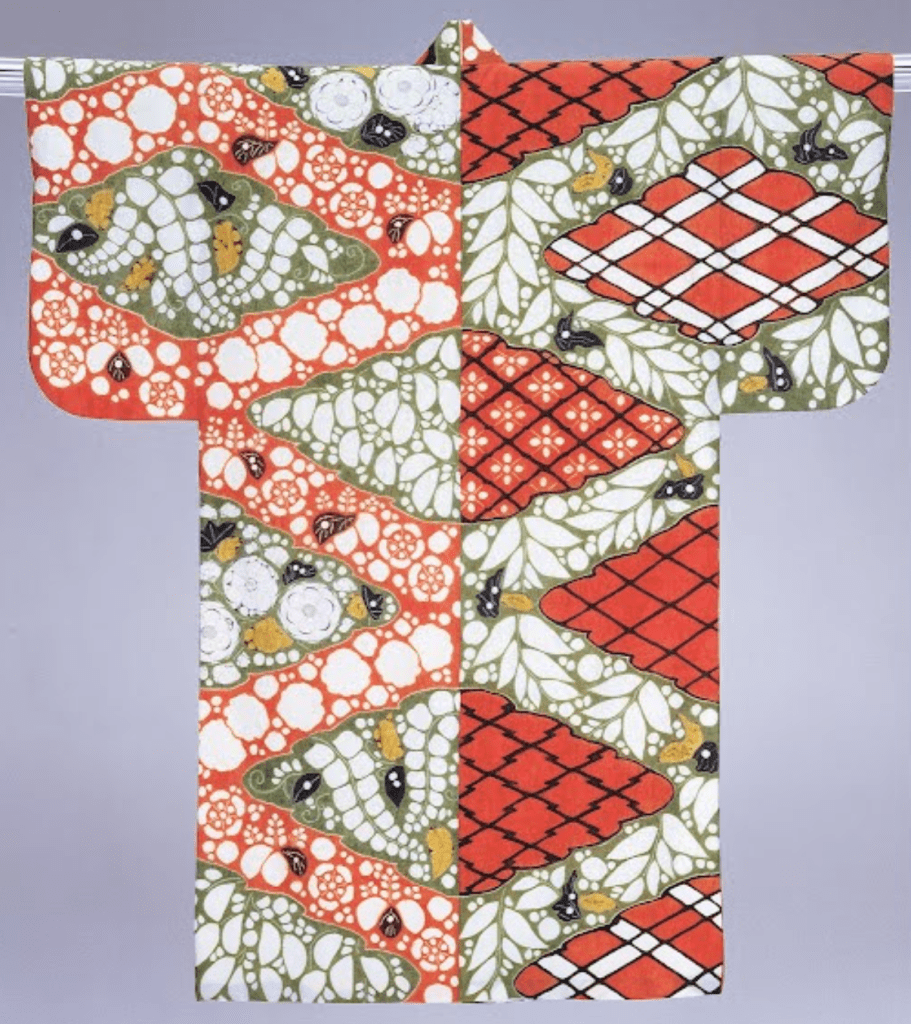
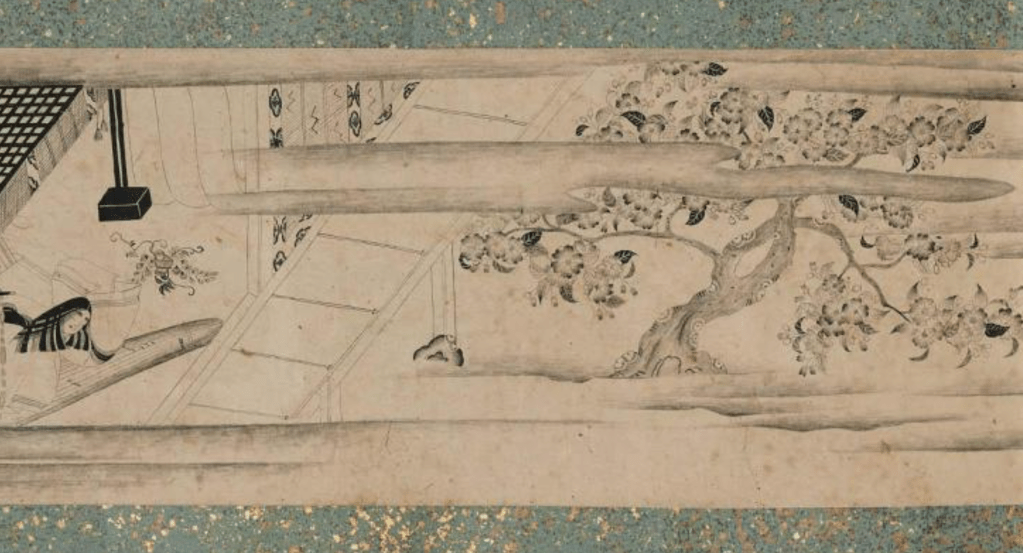
This Muromachi period kosode featuring flowers and birds is one of the earliest extant examples of tsujigahana, in which shibori dyeing is combined with ink painting, embroidery, and/or metallic leaf. The full garment can be viewed here courtesy of the Tokyo National Museum.
This Muromachi period suо̄ features ink deepened with indigo stenciled in conjunction with rice paste resist (katazome).
Image from Cultural Heritage Online.
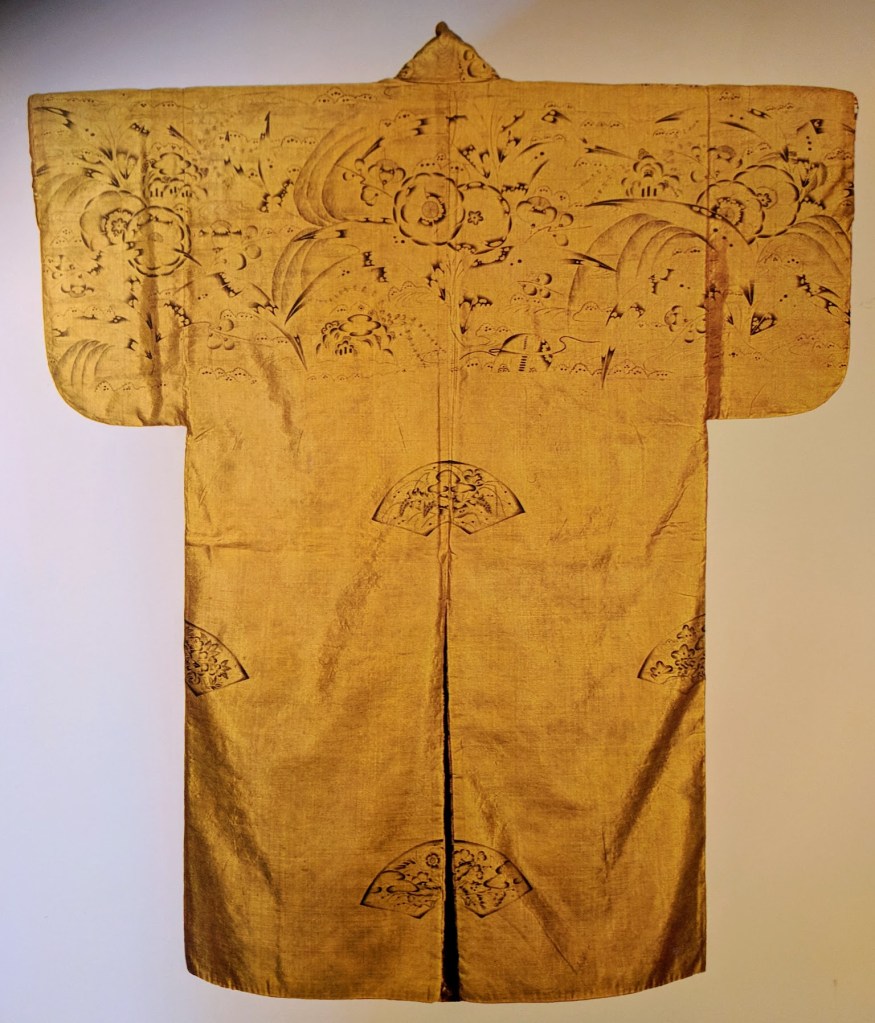
This Muromachi period coat (dо̄buku) is believed to have been owned by Uesugi Kenshin. While this is not technically tsujigahana because it lacks shibori dyeing, the ink painting has the classic stylization seen on tsujigahana garments in a pattern of fans, flowers, grasses and more.
Image from Fukushokushi Zue.
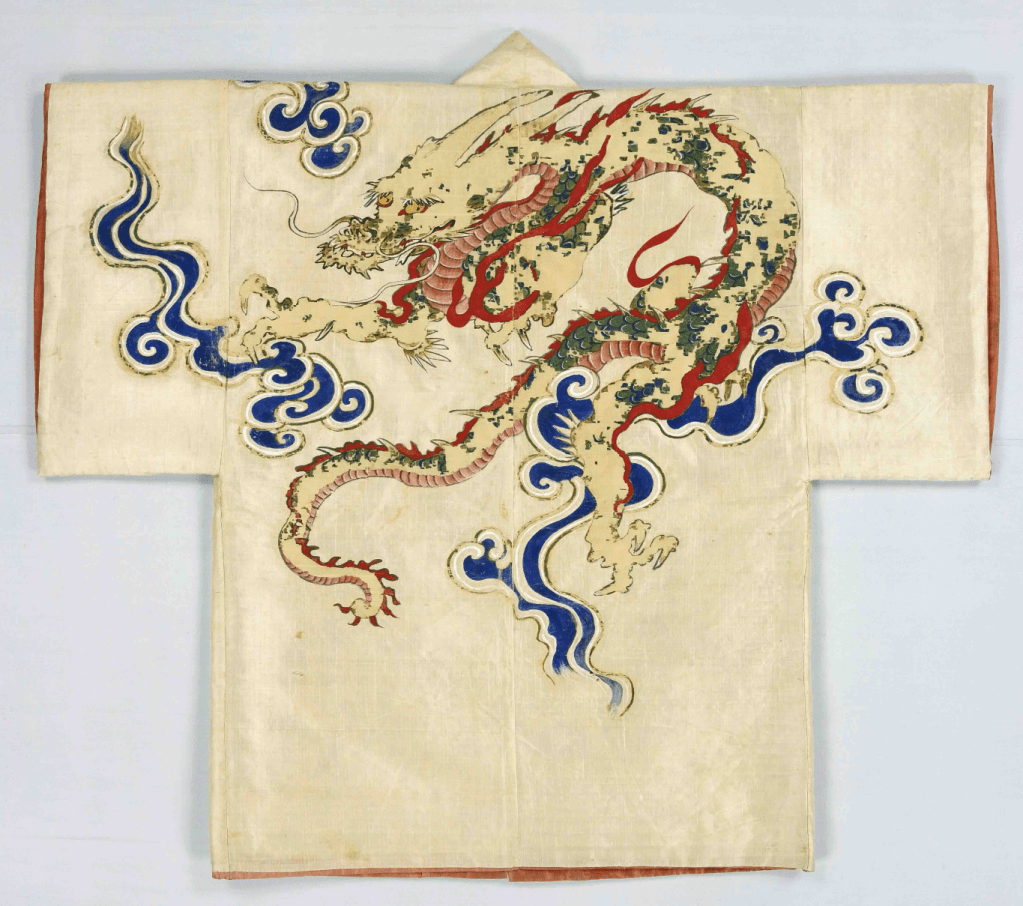
This colorful hand-painted dо̄buku (coat) also belonged to the Dragon of Echigo, Uesugi Kenshin. It was painted using mineral pigments plus animal glue (nikawa). This piece includes white accents most likely made from powdered seashell (gofun).
Image from Yomiuri Shinbun (follow the link for more detailed images which illustrate the green pigment flaking off).
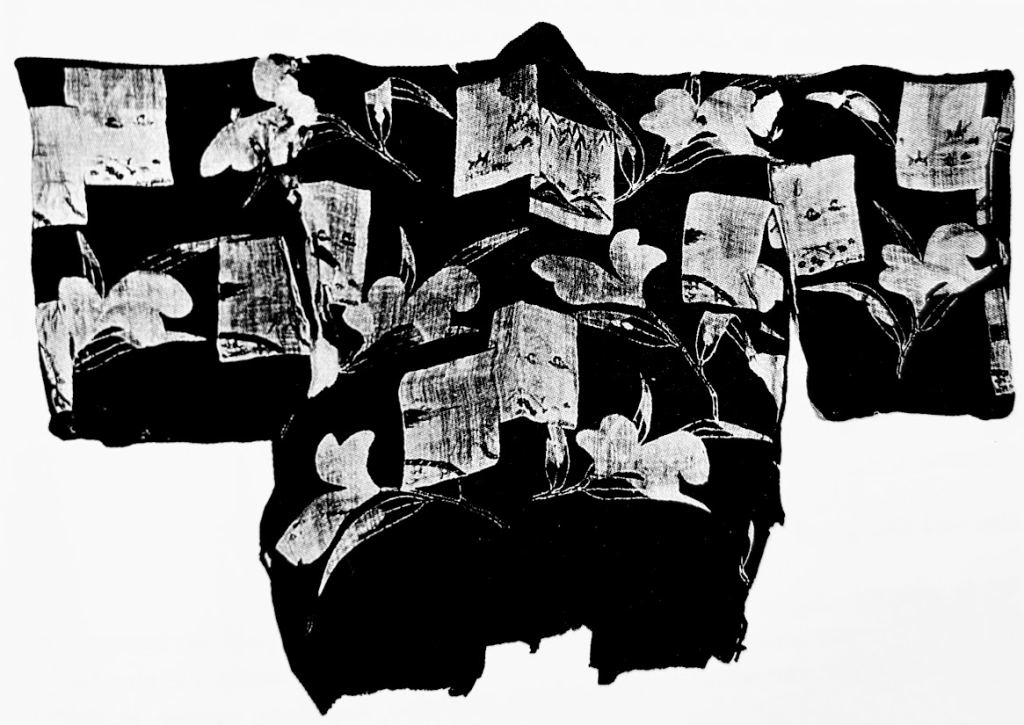
This Momoyama period suо̄ is one of the earliest extant examples of tsutsugaki, rice paste resist drawn by hand. The rectangles (shikishi) interspersed among the flowers contain ink paintings in much the same way as painting is used to accent shibori. While this image is black and white, the actual background color is kachi-iro (褐色, very dark blue).
Image from Momoyama Jidai no Ishо̄.
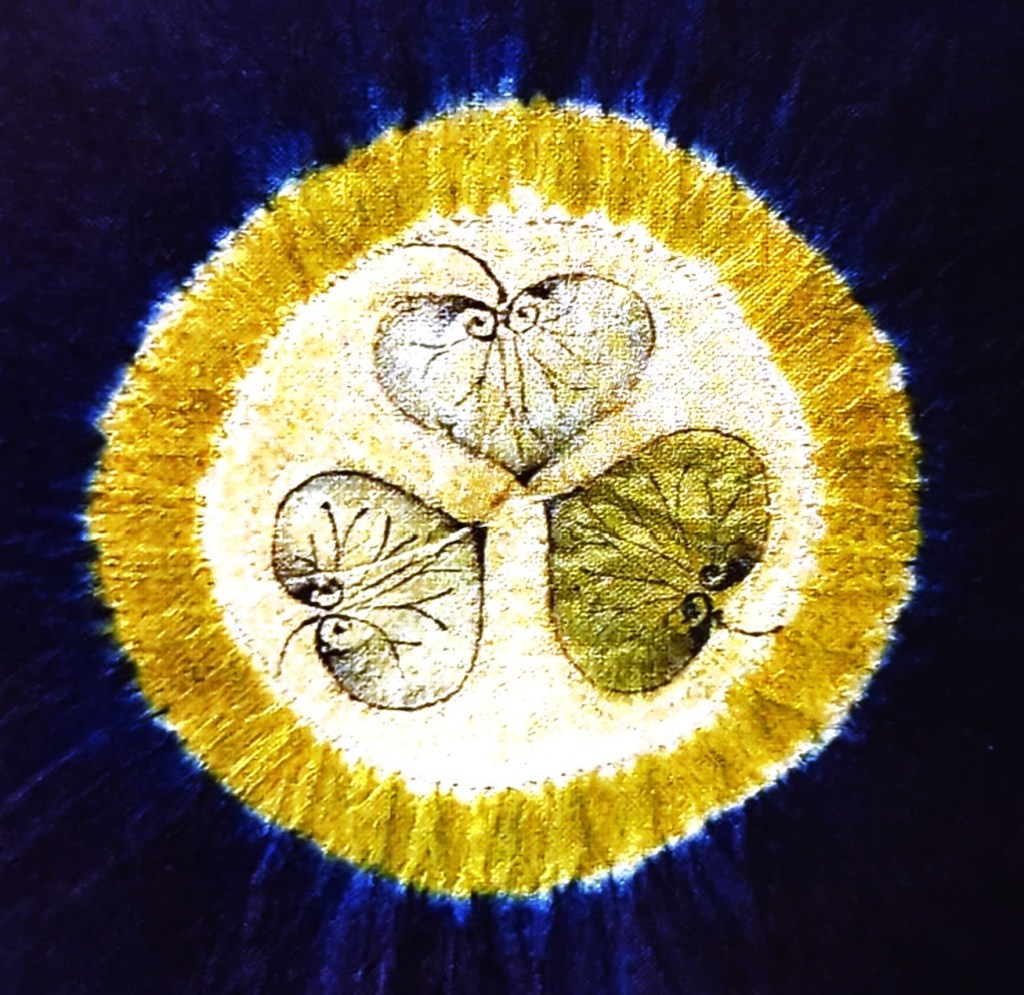
This is the aoi crest of Tokugawa Ieyasu (wild ginger/Asarum caulescens leaves, often mis-translated as hollyhock). Here, the white, blue, green, and yellow zones were created using bо̄shi shibori, and hand ink painting was used as the final step for veins and outlining. Ink-painted details could also be added using a ruler and compass, as shown in this video.
Image from Tokugawa Ieyasu no Fukushoku.
The Visual Design
In looking through photos of garments featuring ink painting, you’ll notice that certain motifs are extremely popular.
- Plants, often featuring dewdrops and insect-chewed holes
- Birds and insects
- Geometrics (diamonds, cross-hatching, pine bark lozenge, stripes, basket weave)
- Landscapes/seascapes
- Everyday items (fans, poem papers, carriages, snowflakes, seashells)
These motifs are combined using a variety of overall visual designs, frequently with background colors created using shibori (compression resist dyeing) The combination of shibori, ink painting, gold leaf and embroidery popular through the Muromachi and Momoyama periods is called tsujigahana.


For more pictures of women’s garments recreated from extant fragments and sorted by time period, see Kyо̄to Senshо̄ku Bunka.
For an extensive collection of ink-painted Muromachi and Momoyama period clothing, see the ‘Tie-dyeing and Painting’ chapter of Tsujigahana: the Flower of Japanese Textile Art.
Images of tsujigahana on Wikimedia Commons.
The Fabric
Most of the painted garments we have are made from nerinuki, a plain weave silk with a strong warp using silk retaining its sericin (the sticky protein which holds the cocoon together) and a soft weft using silk with the sericin removed. The use of this fabric is why so many of our extant garments show horizontal tears: the warp becomes brittle with age. Nerinuki is no longer commonly available; 8 to 16 momme habutae is the closest available substitute.
We also have examples of painting on silk twill (aya), patterned satin (rinzu), and bast-fiber cloth such as the Shо̄sо̄in and block-printed examples, which may be hemp or ramie. We see hand painting on the kamon (crests) of bast-fiber katabira, but stenciling (katazome or surikomizome) seems to have been by far the more common decorative technique for katabira. For fabric types and sources, check out Rei’s extensive article!
The Sizing
In this context, sizing is the process of applying a liquid to the fabric to prepare it for painting. The fabric must be sized before painting to prevent the ink from wicking outward and creating feathered edges, and also to help the ink bind to the fabric permanently rather than washing off. Soymilk is routinely used for this purpose.
Before adding sizing, the fabric must be scoured, which means ensuring that no residue is on the fabric that would interfere with the process. Make sure to follow scouring instructions specific to the type of fabric you’re using.
For full instructions on soy milk sizing, see John Marshall’s website. I use powdered soy milk for convenience at 1 tablespoon per cup; make sure the only ingredient is soy milk powder. Do not use bottled soy milk from the grocery store, which normally contains added sugar, salt and emulsifier that can interfere. For application, Japanese artists prefer stretching the fabric taut and brushing the soy milk on to create a thin, even layer, but I’ve also immersed the fabric with satisfactory results, as long as the soy milk has been filtered through a cloth to remove any lumps. Soy milk ferments quickly; if immersing, knead the fabric for about five minutes to thoroughly saturate it and remove air bubbles, wring it out thoroughly, and lay it flat in front of a fan to dry. Make sure to do your ink painting within about a week of the soy milk application, and do not wash it for three months afterward, because that’s how long it can take for the soy protein to cure and permanently bind the ink to the fabric. If you don’t get to the ink painting within a week, just repeat the sizing process. After three months, you’re good to go – I have ink-painted garments that have been through many machine washes without fading.
If you want to dye the fabric, this can be done before or after the soy milk sizing, but only within the same one-week time frame.
The ink
While ink in general is referred to as sumi, ink designed specifically for painting on fabric is called kachin. Kachin is traditionally made from soot created by burning togusa, a type of rush known for its high silica content (Equisetum hyemale). Togusa is a popular landscaping plant in many locations, but should be strictly contained because of its invasiveness.
Kachin is onomatopoeia for the sound of clinking charcoal, which is considered auspicious. The word is often written using the katakana syllabary rather than kanji characters because the sound is important rather than the meaning. Kachin garments were popular battle attire in the Sengoku period for this reason. Garments dyed with indigo so dark as to be almost black (kachin-zome, producing the color kachi-iro) were similarly considered auspicious and associated with victory, and the color is still often used by modern sports teams.
Kachin ink sticks are no longer produced, but standard ink sticks will also work for this purpose. For painting on fabric, the ink stick should be ground into soy milk instead of water, and should be ground extra dark for a thicker consistency. I am still investigating the addition of thickening agents to more closely imitate the original kachin sticks.
Image of togusa from Wikimedia Commons.

- Blue-black ink made from togusa: kachin (カチン)
- Kachin ink stick: kachin-bou (カチン棒)
- Handpainted kachin: tegaki kachin (手書きカチン)
- Stenciled dye or ink application: surikomi-zome (摺り込み染め)
- Blue-black indigo dyeing: kachin-zome (カチン染め)
- Brush painting in general: kaki-e (書絵)
- Ink painting style normally used for kachin: hakubyо̄ (白描)
- Kachin done with colored ink sticks: iro-kachin (色カチン)
- Image of hakubyо̄ from Utatane Zо̄shi, MFA Boston
The Painting
Tegaki kachin features very fine line work, which dries quickly and does not bleed into the fabric. The brush must have a fine tip but also hold enough ink that it does not require constant re-dipping.
Yūzen supplanted tsujigahana as a fabric decoration technique in the Edo period, so if you want traditional fabric-painting brushes, they will normally be sold as yūzen supplies. The videos on this website give an excellent overview of how each brush will perform. Unlike Pigment Tokyo, Tanaka Nao does not have preview videos, but a fine line brush like this could work. If you would prefer to get a brush locally, you can get similar results from a liner brush, scroll brush, or fine-tip round watercolor brush. Detail brushes typically do not hold enough ink.
Hakubyо̄ ink painting tutorial videos
Image by modern kachin artist Nakayama Eriko.
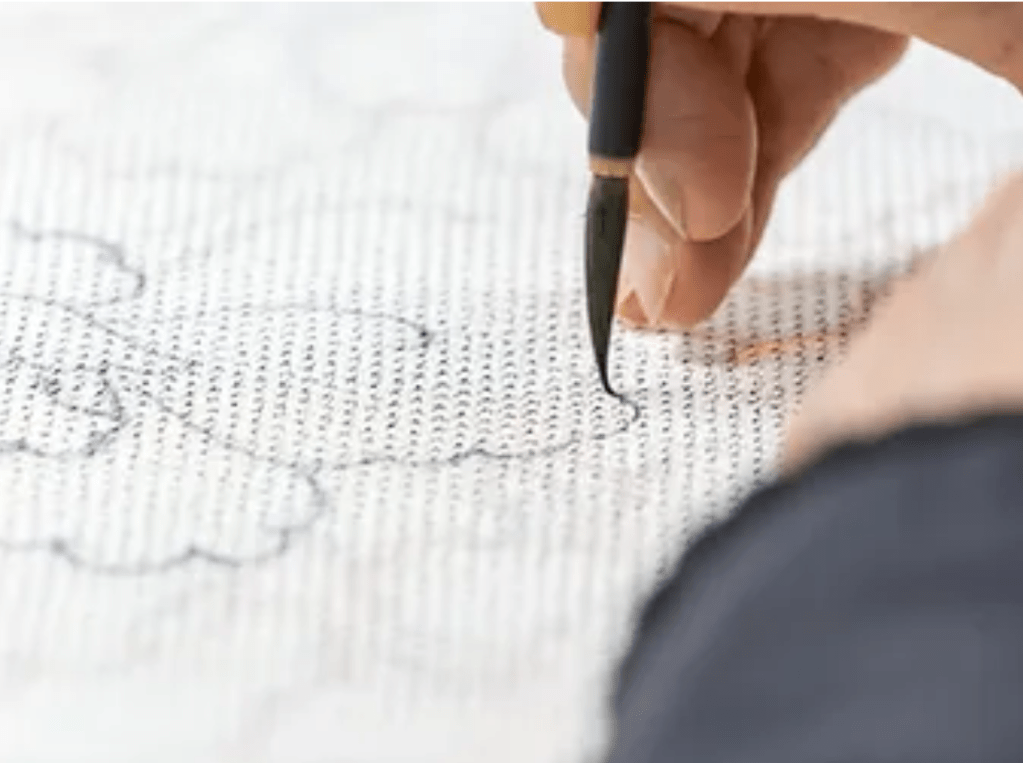
This image from Kimono Ichiba illustrates the hand position. You’ll notice that the non-dominant hand is placed flat and the hand holding the pen is placed on top for steadiness. Touching the pinky finger to the work surface also contributes to steadiness. When stenciling, a wooden work surface is traditionally made tacky with rice paste so that the fabric does not shift. The goal is to make the work surface feel like a sticky note; a similar effect can be achieved using repositionable adhesive spray. Modern Japanese recreators often use a light table for tracing and stabilize the fabric with their hand.

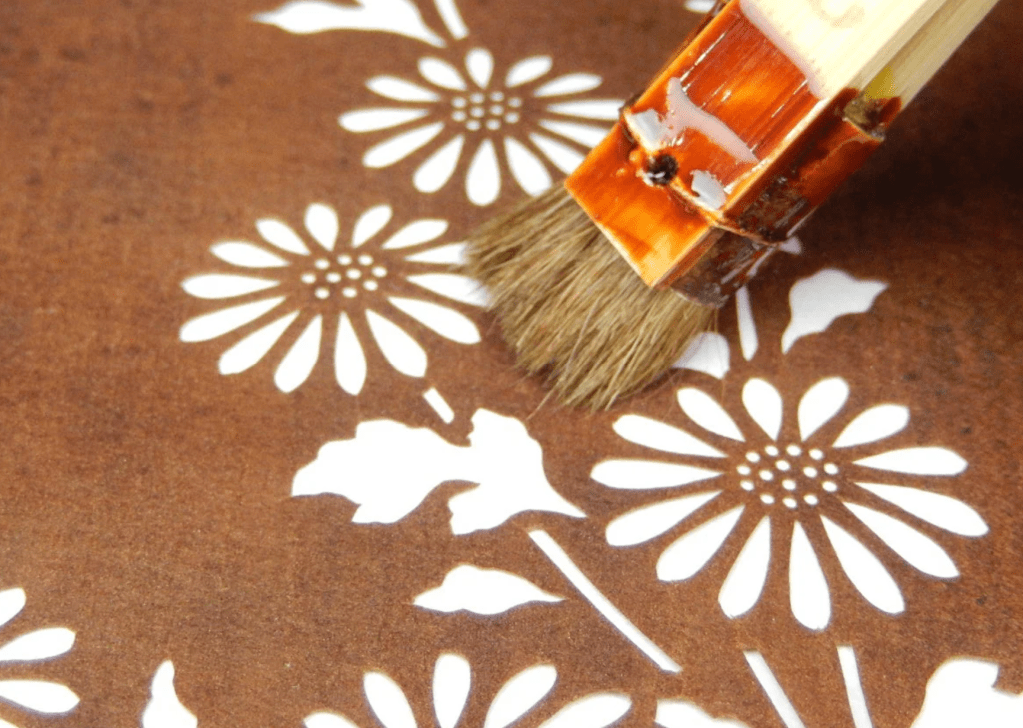
The stenciling (surikomi) should be done using a nearly dry brush and a light, circular motion. Here’s a video of the process using a traditional surikomi brush (surikomi-bake). If you would prefer to get a brush locally, the dry brushes sold for painting models and miniatures work very well.
Image from Aikuma.
In addition to shading using a stencil, shading can also be added freehand using an angled brush (kataha-bake). The bristles are dipped in water, then the pointed tip is dipped in ink, so that the brush creates a fade when drawn across the material. The general term would be an angular shader brush.
Image from Nakagami Dye Shop.

When you look at the hakubyо̄ ink painting style popular on clothing in the Muromachi-Momoyama periods, you’ll notice:
- fine outlining
- multiple fine parallel lines representing feathers, grasses or algae
- soft shading at outer edges
- simple, repetitive stylization
- zones creating visual framing
- disregard of relative proportions and depth perspective
Demonstrations of ink painting on fabric illustrating brush usage

Workflow Summary
- Decide desired project size (if you’ve never done it before, I recommend starting with a handkerchief-sized square)
- Get brushes, ink stick(s) and grinding stone, stencils, soy milk, fabric
- Scour fabric
- Dye fabric (optional)
- Size fabric with soy milk either by brushing or immersion
- Place on tacky work surface
- Paint (freehand or stenciled) within one week of sizing
- Do not wash for three months
References
- E-Shibori-An. “What’s Tsujigahana.” http://www.tsujigahana.com/en-tsujigahana/ Accessed 7/8/18.
- Ito, Toshiko. Tsujigahana: The Flower of Japanese Textile Art. Tōkyō: Kodansha, 1985.
- “Kaki-e.” https://senshokubunka-kyoto.jp/gijyutu/kakie.html Accessed 11/11/24.
- Kawakami, Shigeki. Tsujigahana. Kyōto: Kyōto Shoin, 1993.
- Kitagawa, Heirō. Fukushokushi Zue. Ōsaka: Shinshindō Shuppan, 1969.
- Marshall, John. Soy Milk. http://www.johnmarshall.to/H-Soymilk.htm Accessed 7/8/18.
- Nakano, Eisha and Barbara Stephan. Japanese Stencil Dyeing. New York: Weatherhill, 1982.

Leave a comment