Part 3: Assembling the Hakama
Now that we have our fully cut pieces and we have discussed how to pleat in a lot of the extra fabric, we can dive into the full method of putting the pants together. This assembly method revolves around attaching pieces to the crotch gusset to create the pants, rather than individually assembling legs and then trying to put them together and insert a gusset at the end. These instructions presume some familiarity with sewing skills and terms. If you are not yet familiar with the basics of sewing, there are many places where you can easily learn how to do some basic sewing by hand or machine for free. There are many YouTube tutorials about basic sewing skills, or perhaps you have a friend who can help guide you. Sometimes local libraries, community centers, and maker spaces have a way you can use a sewing machine and/or classes to help you learn to use them. Japanese clothing is a great entry point into making historical clothing because it relies on simple straight seams for a lot of its construction.
Where Does Everything Go?
Based on the Measurements you took earlier, we can figure out where all the pieces should be arranged with each other and where all the seams should begin and end. Here is how those measurements translate onto the pisces themselves.
- Rise Join – The right and left legs of the hakama will join together at the top front of the hakama and then again at the top back. The length of this join will be equal to your rise height (about belt to knees).
- Gusset Join – The length of the top to bottom of the crotch gusset measurement on the leg panels is equal to one of the sides of the crotch gusset itself.
- Inseam – The inseam is the remaining length of the leg panel from the bottom of the gusset join to the bottom hem.
- Side Opening Flap – This triangle of fabric will get folded into itself to create a slanted section of the hakama. The length of this triangle (not the hypotenuse) is from your belt to the top of your knee. The width can be varied to make sure that the final top width of the hakama matches your measured Front or Back Width, but will probably be around 7-8”.
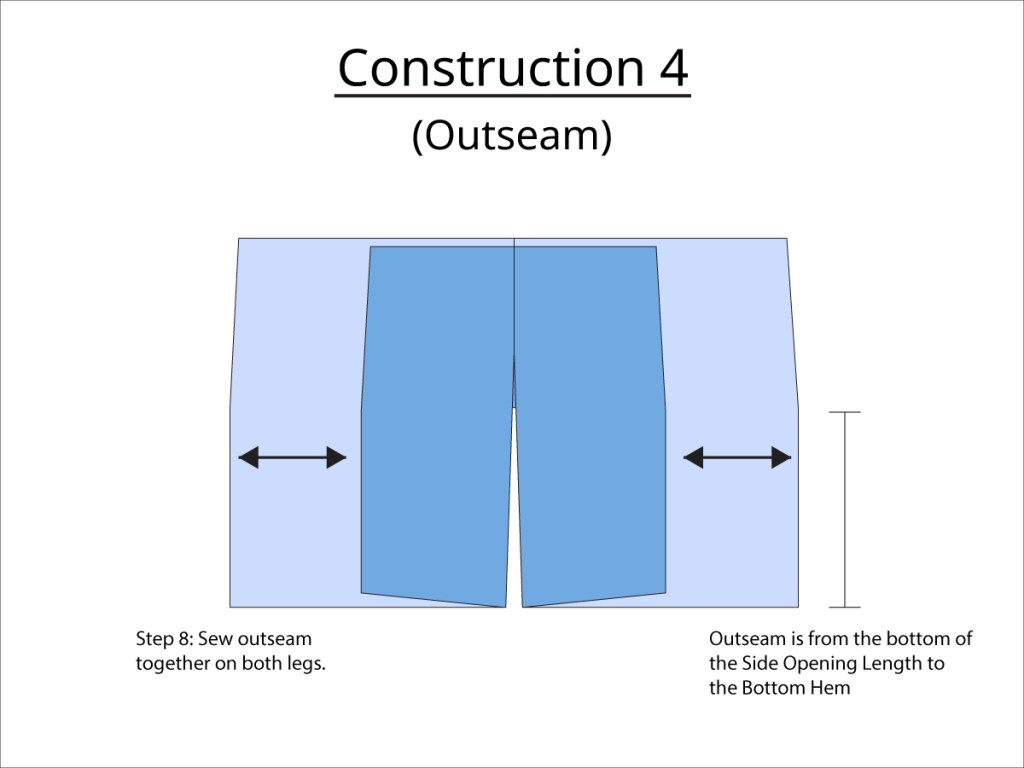
- Outseam – The Outseam is the remaining length of the leg panel from bottom of the opening fold to the bottom hem.

Assembling the Pants
Step 1: Line Up the Pieces
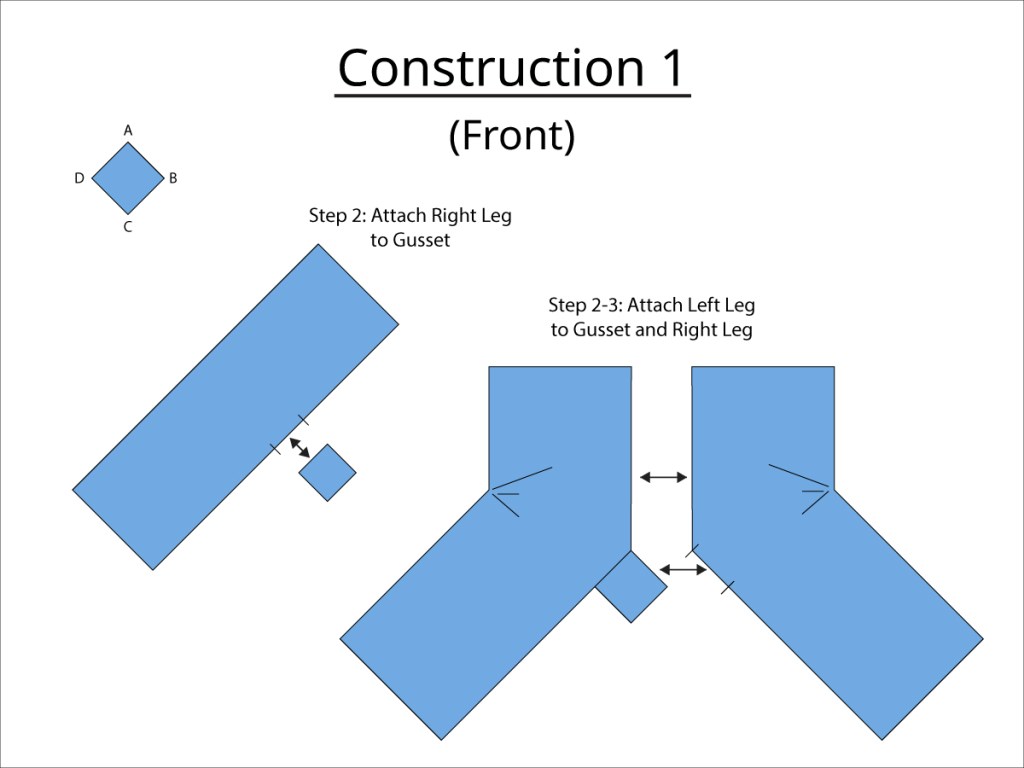
There are four sides to the crotch gusset. Each one corresponds to a letter matching one of the leg panels. This is the area where you will attach the matching leg panels. So, Side A on the gusset attaches to Panel A of the legs.
Looking at the gusset from the wrong/inside side of the fabric, the sides are like this (going clockwise from A to D.)
The majority of this pattern presumes that you will put the right/face sides of any two pieces of fabric together and sew those
Step 2: Attach Front Panels to the Gusset
Sew side A of the gusset to panel A of the front legs. Sew side B of the crotch to panel B of the front legs.
Step 3: Assemble the Front
Sew together the sections of panels A and B which are positioned above the crotch gusset. (This area is by the AB corner of the gusset.)
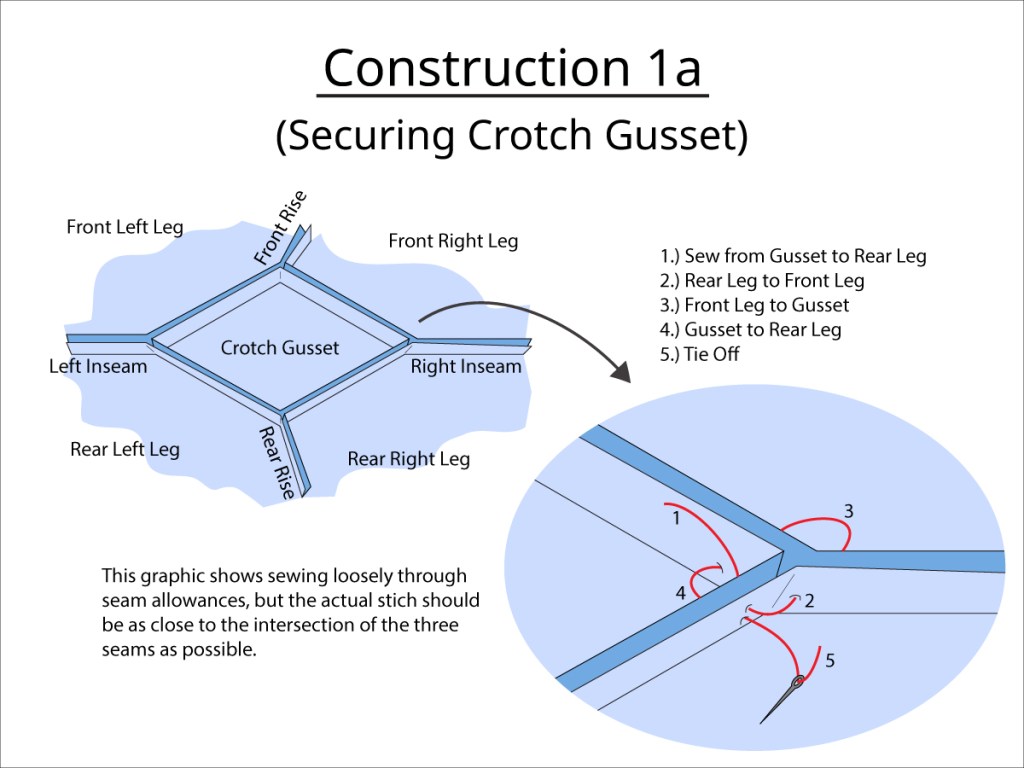
Step 4: Reinforce the Gusset corners.
At each corner of the gusset, you will need to sew a continuous stitch between each section of fabric at the place where all three seams meet. This is easiest to do by hand and goes very quickly. For now, run a stitch at the base of the seam allowance between the gusset and panel B. Continue the stitch from panel B, to panel A, and then from panel A back to the gusset. Go one more time from the gusset to panel A and then tie off and trim the thread.
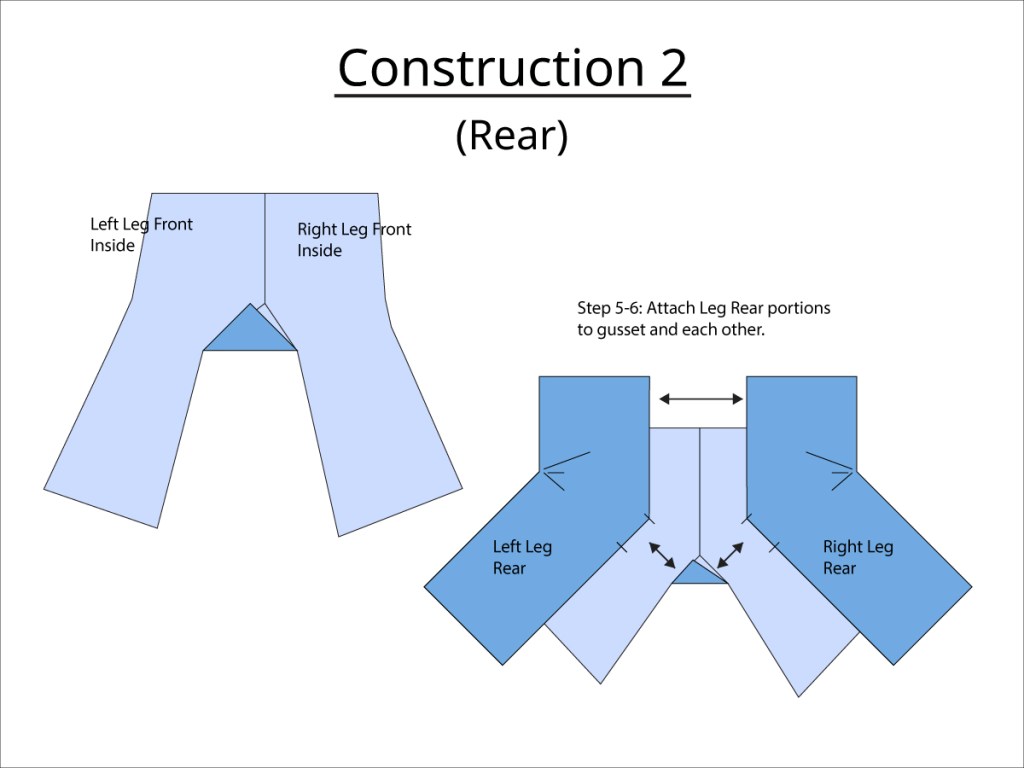
Step 5: Attach Back Panels to the Gusset
Sew side C of the gusset to panel C, and side D to panel D.
Step 6: Assemble the Back
Sew together the sections panels C and D which are above the crotch gusset. Reinforce the point by sewing from gusset to panel D, D to C, C to the gusset, and then gusset to D again. Tie off and trim the thread.
Step 7: Inseam
Sew together the sections of panels A and D from where they meet at the gusset down to the bottom hem. Reinforce the gusset point by sewing gusset to A to D to the gusset to A. Tie off and trim the thread.
Sew together the sections of Panels B and C from where they meet at the gusset to the bottom hem. Reinforce the gusset point by sewing from gusset to C to B to Gusset to C. Tie off and trim the thread.

Step 8: Outseam
Sew together panels A and D from the meeting point of the side openings to the bottom hem. Sew together panels B and C from the meeting point of the side openings to the bottom hem. Finish the bottom hem of the pant legs with a rolled hem.
Making the Pleats
Step 1: Some Explanation
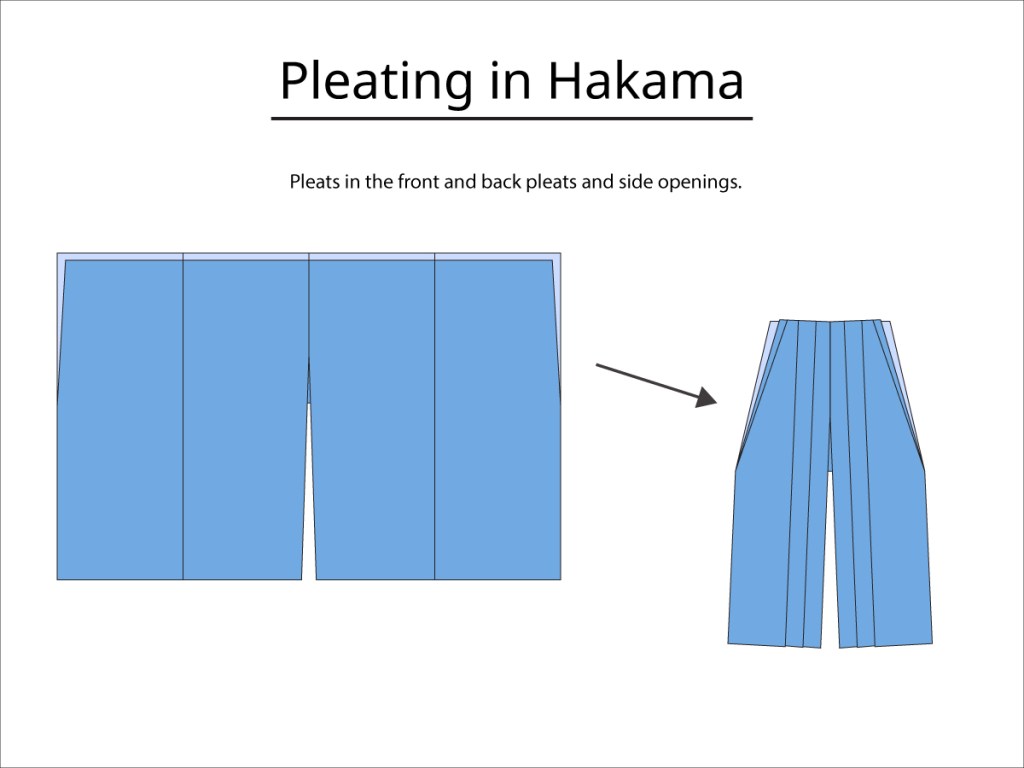
The front and back of the hakama are pleated from the top to the bottom. The front pleats are a box pleat with one or more extra knife pleats to the side. The back pleats can be either similar knife pleats or stacked box pleats, also facing the center. This pattern uses the stacked box pleats method. Enterprising sewists can readily substitute in the knife pleat method when it suits their designs.
Along with the pleats, the top corners of the front and back of the hakama are folded inward to create triangular openings in the sides of the hakama which allow them to be comparatively one size fits all at the waist.
These pleats make the front and back top of the hakama fairly narrow. The tops of the hakama should not meet at the sides and should leave space for a side opening. There is not one set width of the tops of the hakama, but they probably should not be much wider than one “tan” panel width. Your individual pleat size may be deeper or shallower than someone else depending on your tan size and your desired final width. You may need to play with folding and pinning your fabric in different arrangements to get a final width that you are happy with.
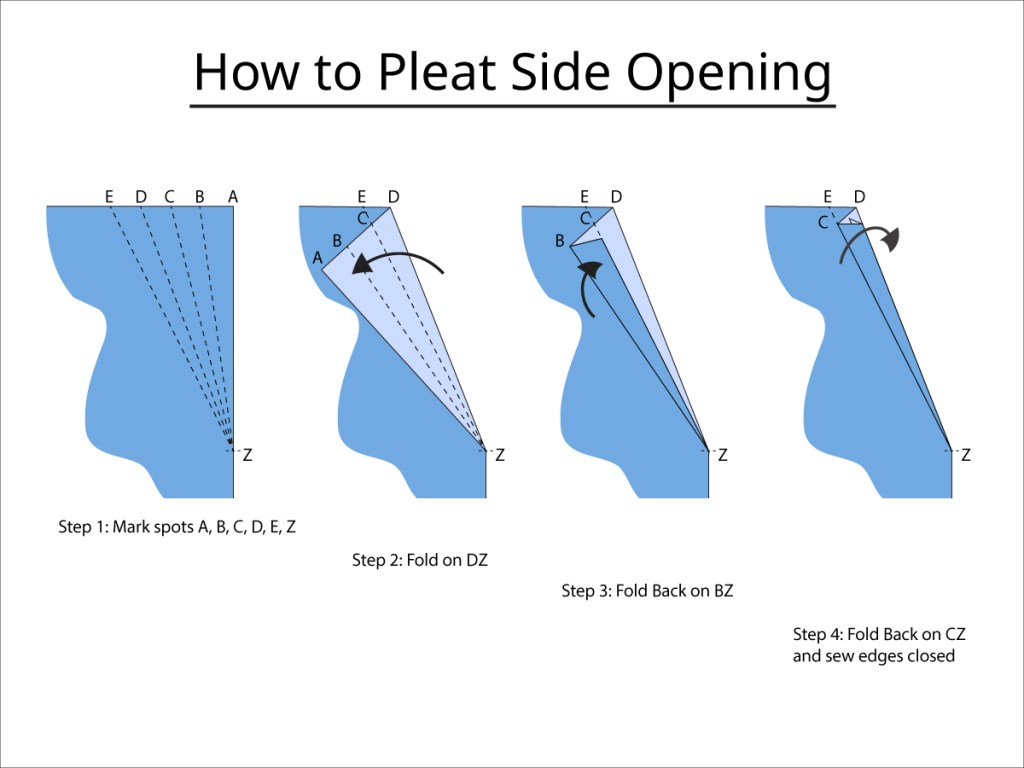
Step 2: Fold the Side Openings
The top corners of the legs need to be folded in to create the side openings where the hakama transition from the narrow top to the full width of the legs.
For this fold you will have 5 points along the top of the hakama (A, B, C, D, E) and one point lower down the leg (Z.) The distance from A to B should be a little bit shorter than the other lines. The fold goes like this.
- Fold the top of the hakama at the line from D to Z. fold outward so that the right (external) sides of the fabric are together. Line CZ should line up with EZ. Pin in place near points C and E.
- Fold along line BZ with the wrong (internal) sides together so that point A moves toward (but doesn’t meet) point C. Pin along the top of the fabric.
- Fold the fabric back along Line CZ so that line BZ meets with line DZ. Pin this new arrangement in place and remove the other pins from this fold-in.
- Basting stitch this fold-in in place along the top.
- (Optional) Hand stitch the fold-in in place along the lines CZ and D/BZ.
- Make sure that point Z is pinned in place with all its folds.
- Repeat this process for the left front and left/right back sides of the top of the hakama. Different widths between top line points will give a different angle and length of the diagonal line on the side openings.
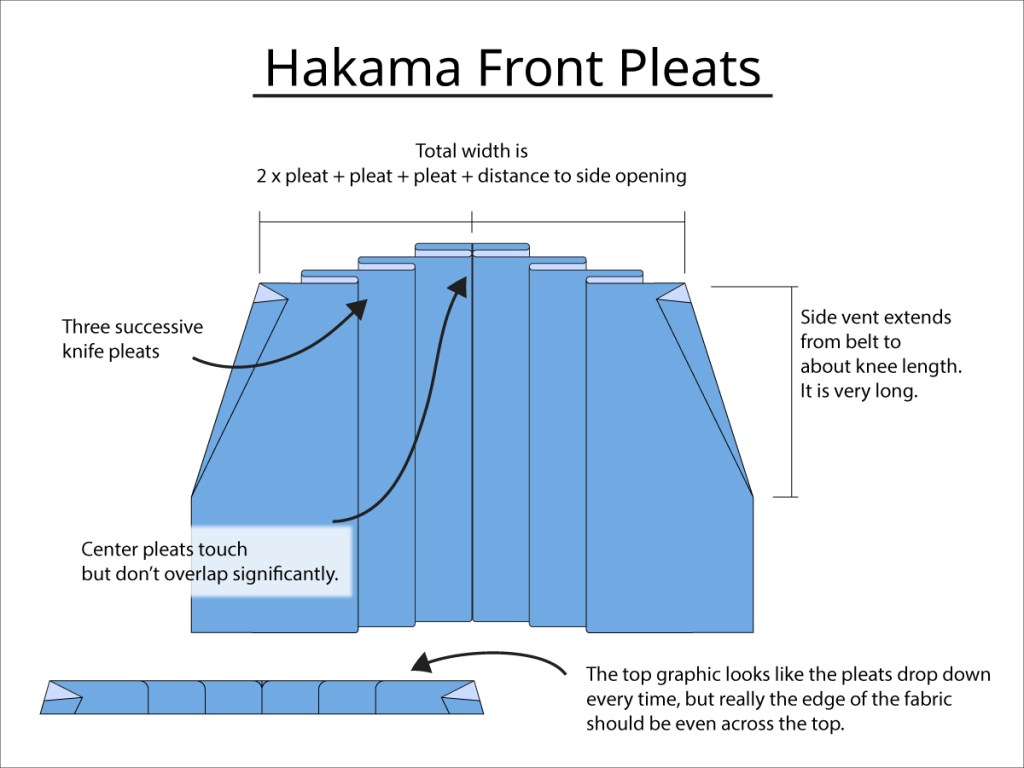
Step 3: Fold the Front Pleats
Please refer to the section on Box Pleats and layering Knife Pleats for specific instructions on how to make pleats.
- Make a box pleat in the center front top of the hakama.
- Make at least one knife pleat (facing center) to either side of the box pleat.
- (Optional) make other side knife pleats if you need.
- Sew down all pleats to make them secure.
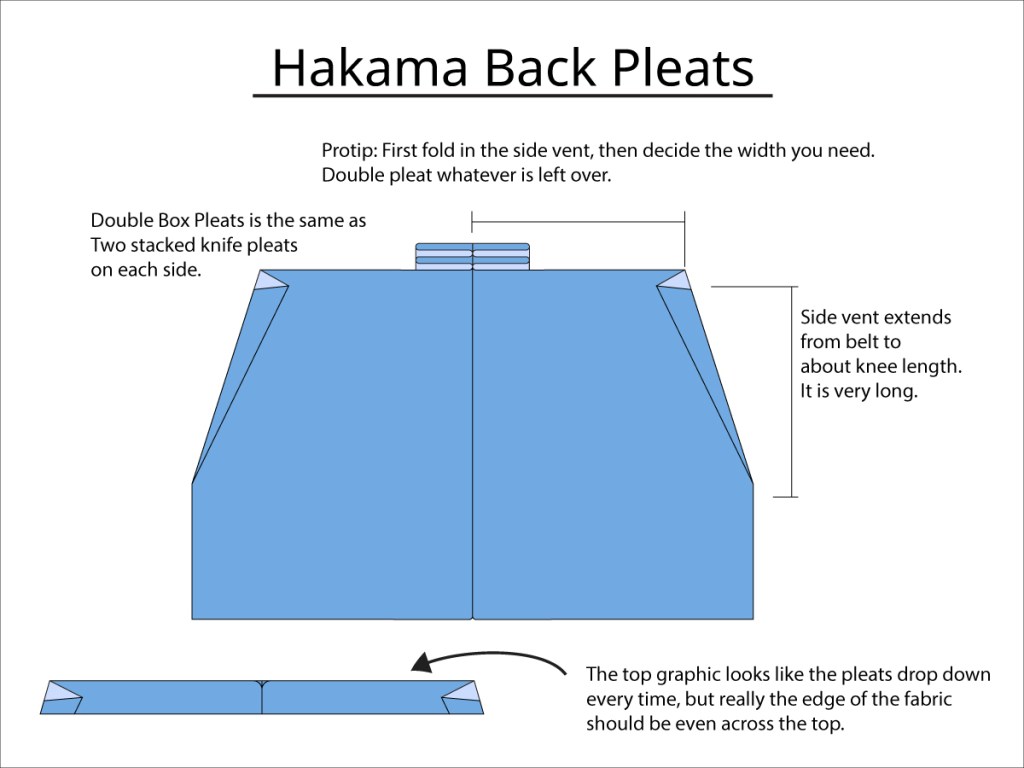
Step 4: Fold the Back Pleats
In contrast to the front of the hakama, the back section has only a stacked box pleat, which will make it easy to identify the front and back sections later when putting on your hakama.
- Make a stacked box pleat in the center of the rear top of the hakama.
- Sew the pleats in place along the top of the hakama.
Waist Ties
Step 1: Explanation
Hakama are held up on your waist by ties attached to the tops of both the front and back of the hakama. The front ties are much longer than the back ones (roughly twice as long.) Even the back ties should wrap around your waist more than once and have extra length for securing in a knot.
Step 2: Fold the Waist Ties
- Fold the fabric for the waist ties in half, lengthwise, with wrong sides together. Making sure that these long folds stay in place can be difficult with such long strips of fabric. Feel free to press and pin folds in place as you go, if necessary.
- On the open side of the fold, fold a small lip under, lengthwise.
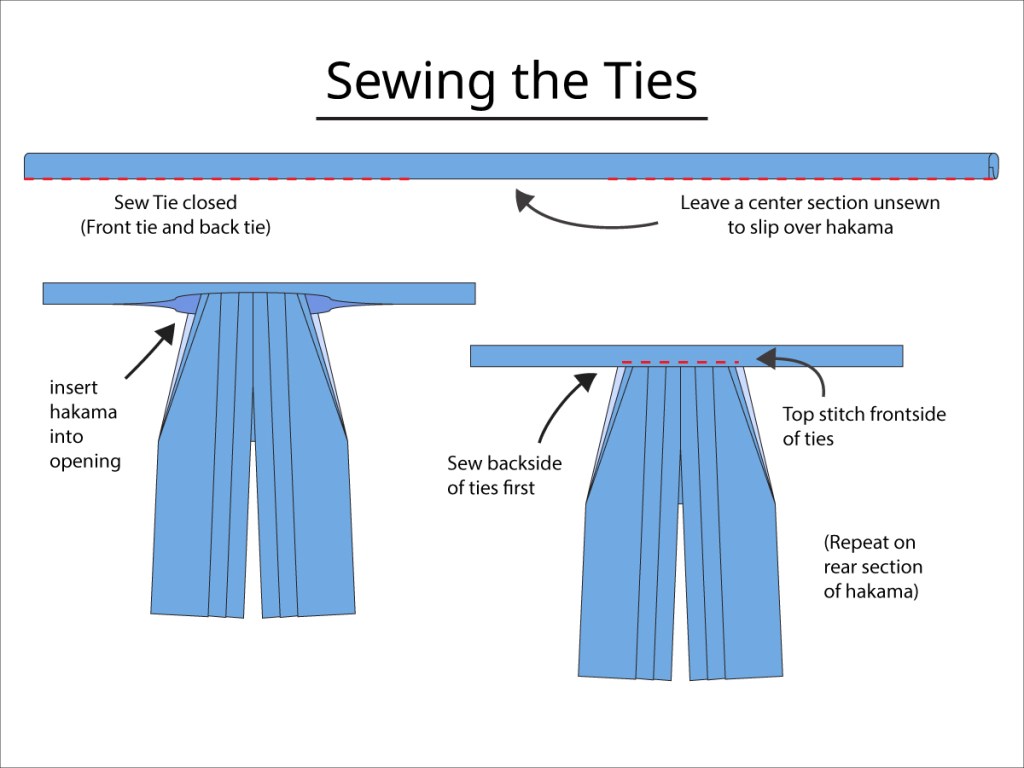
- Fold the fabric in half again, with the folded lip on the inside. Sew this flat tube of fabric closed. Leave an unsewn portion in the middle of the fabric length about 1.5-2x as wide as the top of the hakama to attach to the hakama later.
- Fold in the ends of the hakama and sew closed.
- Repeat for the back ties as well.

Step 3: Attach the Front Ties
- Insert the top front of the hakama into the unsewn pocket of the front ties. Make sure the center of the hakama meets the center of the length of the ties.
- Pin the ties to the hakama along the fold line of the internal lip of the ties.
- Attach the hakama to the ties along that fold.
- Fold the ties back over the top of the hakama and top stitch the front section of the ties to the hakama.
- Sew the remaining edges of the pocket closed.
- Repeat for the back ties.
There’s More
This article is in three parts
- Part 1: Description and Measurements
- Part 2: How to Fold Pleats

Leave a comment